
I found it quit difficult to configure DirectAccess on the Citrix NetScaler combined with Windows 10 machines.
This because Windows 8 and 10 machines connect differently to DirectAccess than previous versions when using a IP-HTTPS connection.
Keep that in mind if you have already a DirectAccess setup in place (combined or not combined with a Load balancer), and you are deciding to upgrade the client platform to Windows 10 (yet that latter one is not a bad idea ![]() )
)
Yet again, I struggled with this setup after watching again a real good Webinar by Citrix about using advanced ADC configuration for Microsoft DirectAccess to improve data center security in which Richard Hicks took a big part in. In that webinar he showed what to watch out for when configuring a VIP for DirectAccess; the only thing is; when you pause the video at 43m 17s, and look closely to the SSL configuration… you'll notice it wouldn't work; encryptions protocols like TLS 1.0, 1.1, 1.2 and SSLv3 are disabled; if you would copy that literary to your NetScaler; it won't work. So the part of the used Cipher suites is true, but don't pay close attention to the rest of the screen.
But still; this Citrix video is great to watch and Richard explains a lot; what is good thing of course.
So what has changed ?
Previous version of Windows, Windows 7, utilizes a double encryption method when using a IP-HTTPS connection to DirectAccess. The data is encrypted via IPv6, and put inside a HTTPS packet, that is also encrypted; hence double encryption is utilized. Imagine putting a written letter in a Safe, and put that Safe in another Safe; and when it arrives on its destination; both Safes must be unlocked to see the letter. You can imagine that double encryption comes with more processing power on both ends of the connection; the letter doesn't get on its own into two safe's
From Windows 8 up to Windows 10, the use of a IP-HTTPS null encryption method was utilized in combination with the SSLv3 protocol (the one released 21 years ago back in 1996). The data can be encrypted via IPv6, because IPsec security is mandated in the IPv6 protocol specification, allowing IPv6 packet authentication and/or payload encryption via the Extension Headers. However, IPsec is not automatically implemented, it must be configured and used with a security key exchange; in case of DirectAccess, DA utilizes this. The IPv6 packet is placed inside a HTTPS packet, that uses a NULL cipher suite; the NULL ciphers are ones that do not offer encryption. So coming back to the safe comparison; the letter is put in a Safe, but that safe is put in a briefcase (that looks like a Safe, but is not a Safe :) )
That speeds up a lot and enhances performance and scalability (less servers needed because less processing power is needed for the same amount of users). I can hear you thinking; what about security.
Well the good thing is, if the briefcase was intercepted by some entity; they only find a real safe in the briefcase.
In depth information about this you can find here at Richard Hicks Blog
Keep this change in mind about how Windows Clients utilizes DirectAccess connections when you have hardened your DirectAccess setup. If you have hardened the SSL Cipher Suites by following best practices (which is not a bad thing of course); Windows 10 machines probably can't connect to your DA infrastructure. Big chance you disabled the NULL cipher suite, because SSL Labs would rate a thick red F (will come back to this later.)
But wait a minute; SSLv3 ?! That is vulnerable for POODLE attacks!
Yes that is true, and I can't 'put a needle in between of that' (literary Dutch translation :) ). Yes, SSLv3 is vulnerable for POODLE and I'm fully 100% agreeing with you that it shouldn't be utilized. Think back to my Safe comparison; the interesting payload is encrypted via IPv6 using its Extension Headers; so no matter what the safe is transported in; hence if it was a wicker basket (extreme comparison), the interesting data is still protected.
What will I have after reading this blog post ?
Well, if you ask me :) you will have a highly scalable and performing DirectAccess environment that is both safe and very fast. This because we are using the HTTPS with the SSLv3 protocol, a NULL cipher and protecting the VIP with the 'request client certificate' that is mandatory for successfully setting up a DA connection by the client.
Prerequisites / shopping list.
Citrix NetScaler 11.1; one armed configuration with 2 subnets.
Four VIPs
One for External Connections
One for Internal Connections
One for Network Locations Services
One for the WebProbeHost of Direct Access
Two Windows 2012 R2 servers, properly updated
Windows 10 machines domain joined
Own PKI Infrastructure available
Windows 10 Clients are receiving Computer Certificates.
The PKI CA certificate is installed on your NetScaler.
This blog post is about preparing DirectAccess on Windows 2012 R2 for Windows 10 clients and is based on the following prerequisites.
If you don't know how to import a certificate on the NetScaler; look at this Citrix article explaining it:
How to Add an SSL Certificate Bundle on the NetScaler Appliance
Here you can see a technical design (figure 1) how it will look like when were are done.
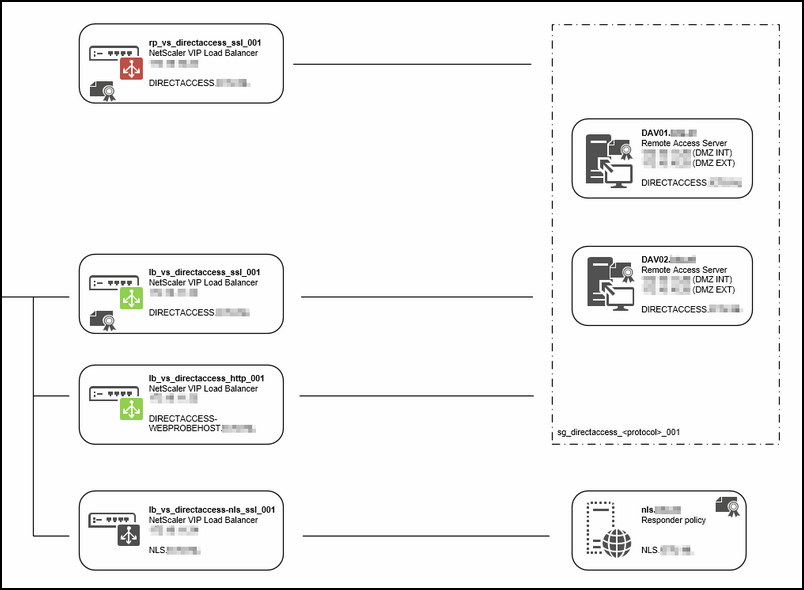
DirectAccess depends on Network Location services to check if the computer is on-premise or not, so the NLS service is a critical part of your DirectAccess Setup. Microsoft discourages to install this role on the same server as DA itself.
Also don't install this NLS role on an intranet web server, but use a dedicated server for this.
The Citrix NetScaler can do this for you; just go to this website. Richard Hicks explained it very well how to do this, so I won't type it for you.
Install the first DA server
I borrowed this part from another site for your convience.
First import the certificate on the first DA server; make sure that it is place in the Personal store of the Computer.
Incase that you don't know how; follow this article on TechNet.
Step 1: Adding the DirectAccess role to the designated server
1. Log on to the designated server as member of domain administrator or enterprise administrator security group
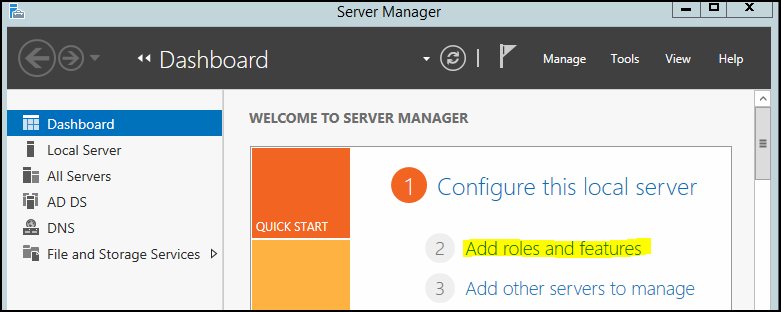
2. Navigate to Server Manager > Add Roles and Features
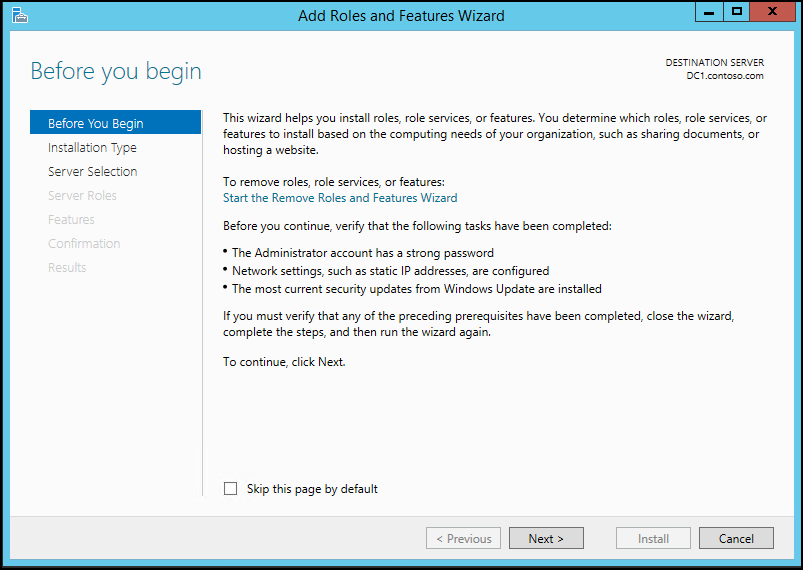
3. Once the wizard opens, click next to continue
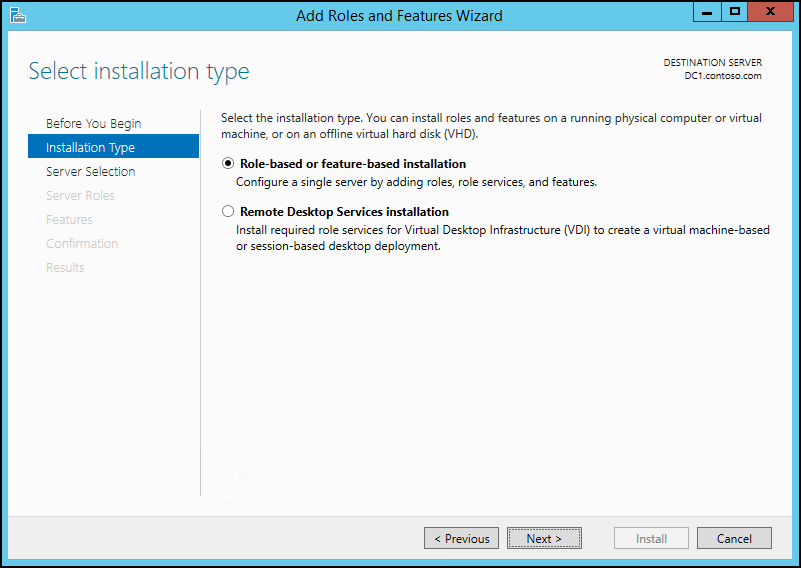
4. Select option “role-based or feature-based installation” and click next
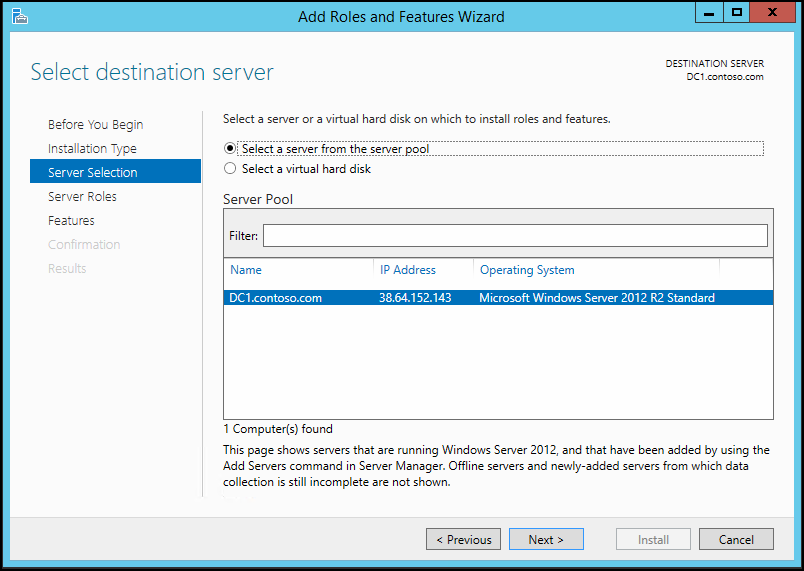
5. From the server selection I keep the default and click next
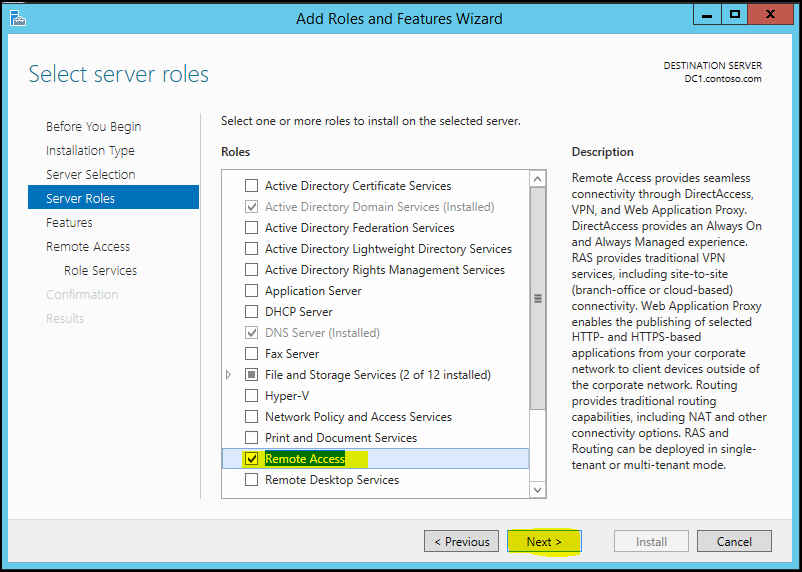
6. From the server roles list, put tick box on “Remote Access” option and click next
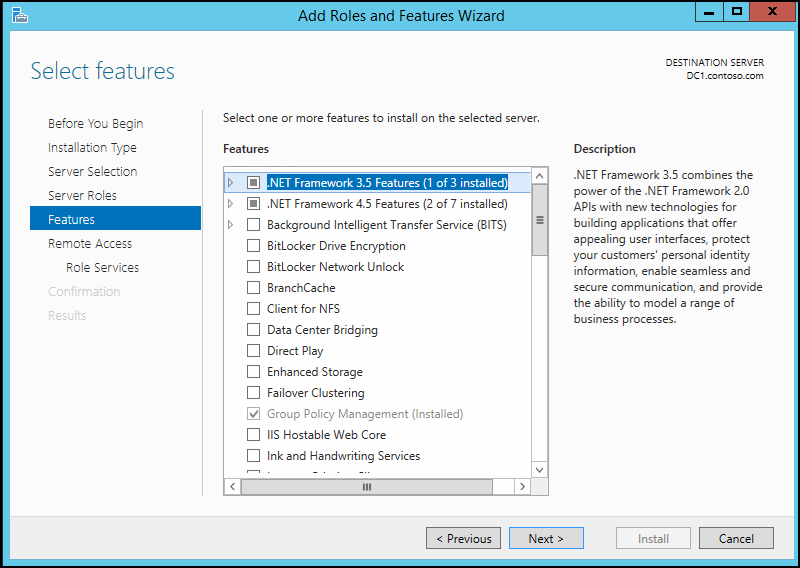
7. From the features list keep default and click next
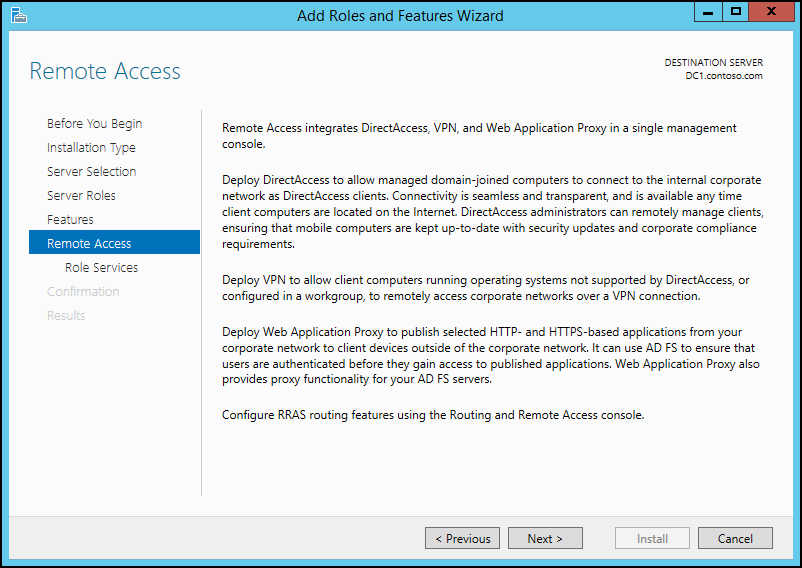
8. In next window it gives explanation about remote access role and click next to continue
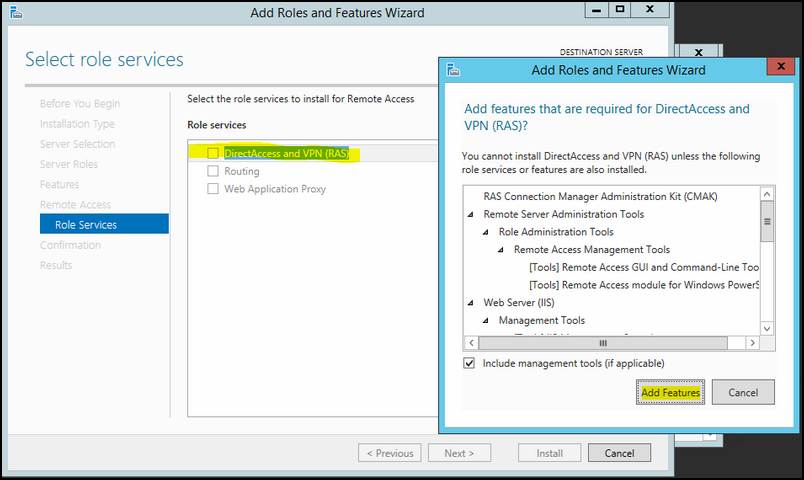
9. On role service list click on “DirectAccess and VPN (RAS)” option to select. Then it will prompt to add related features. Click add feature to add them
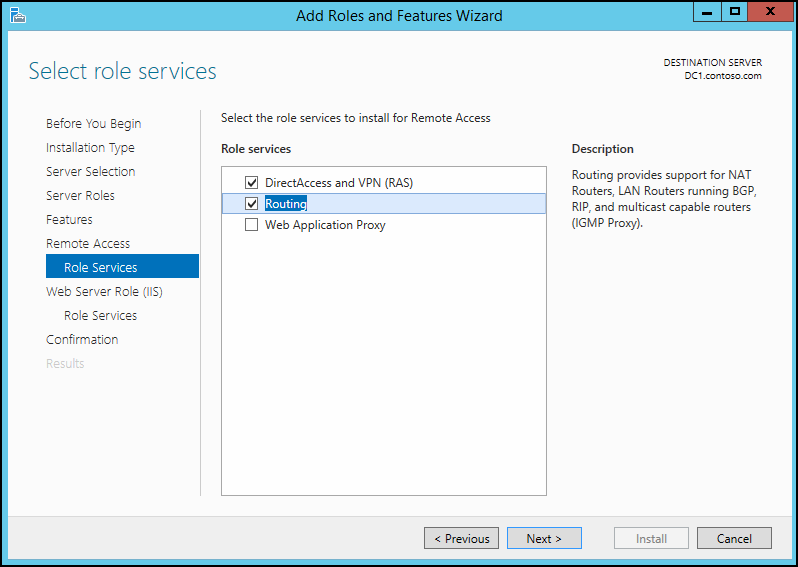
10. If the deployment also need routing services make sure to add “Routing” option too. Then click next to continue
11. Click next to continue when the process displays a description about web server role
12. For IIS role services keep default and click next to continue
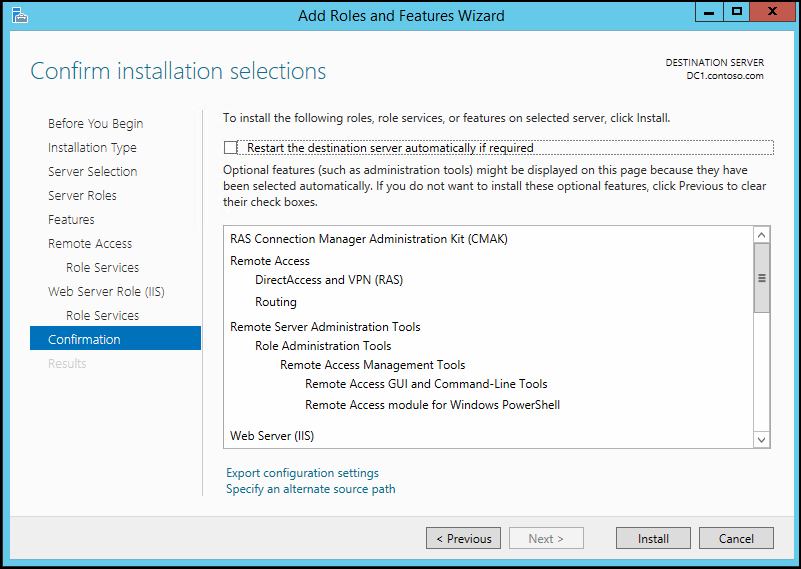
13. At the confirmation about roles and features screen, click install to continue
14. Wait for the installation to complete
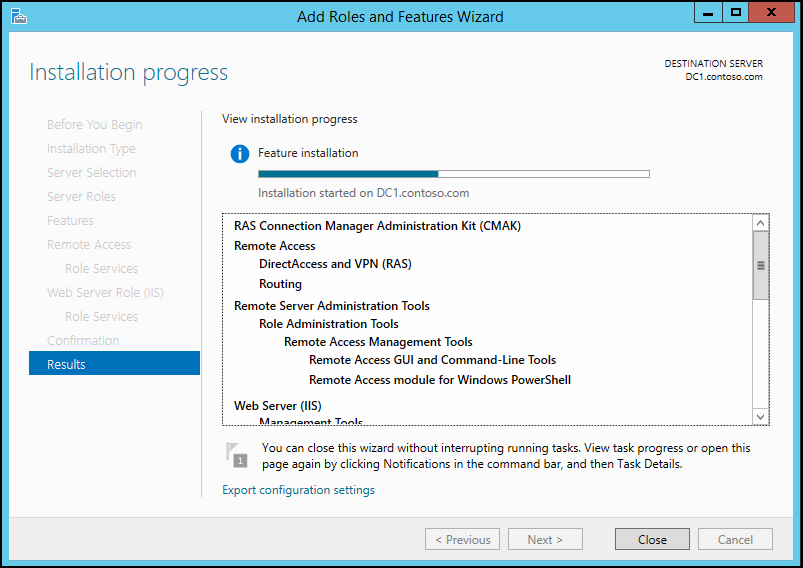
15. After it is completed close the console to exit from the wizard
Step 2: Configuring the DirectAccess service
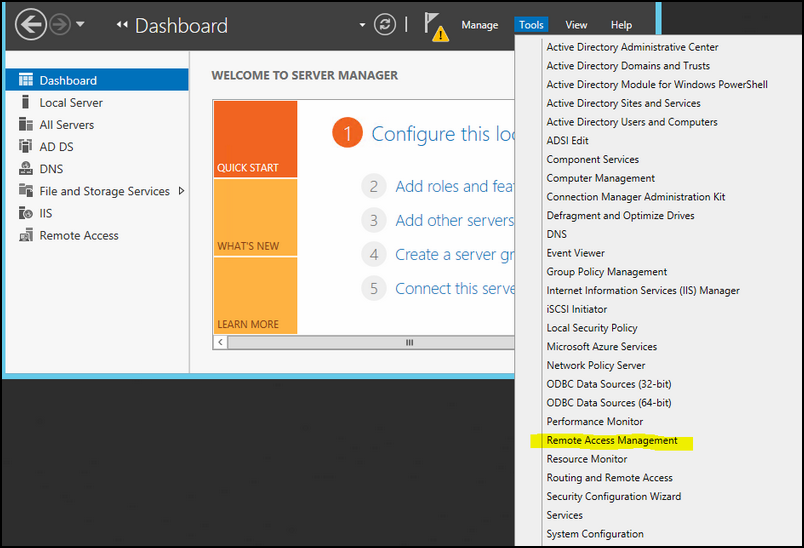
1. Navigate to Server Manager > Tools > Remote Access Management
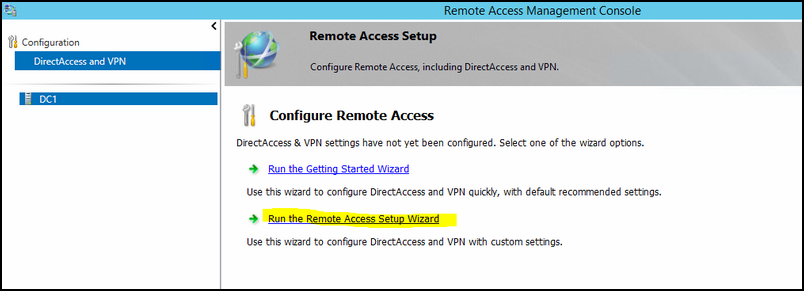
2. Then it will load the mmc and from there select DirectAccess and VPN and configuration section in left hand panel
3. To run the wizard click on the option from Remote access mmc
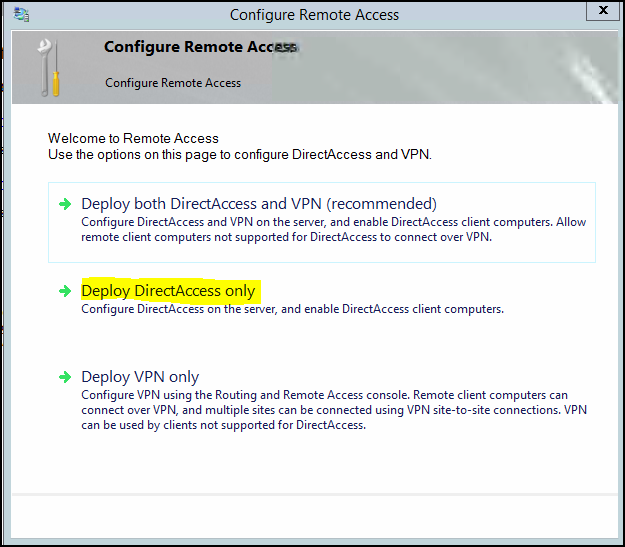
4. From the console select option Deploy DirectAccess Only
5. Then in next window (figure 16) it shows 4 main steps to complete the configuration.
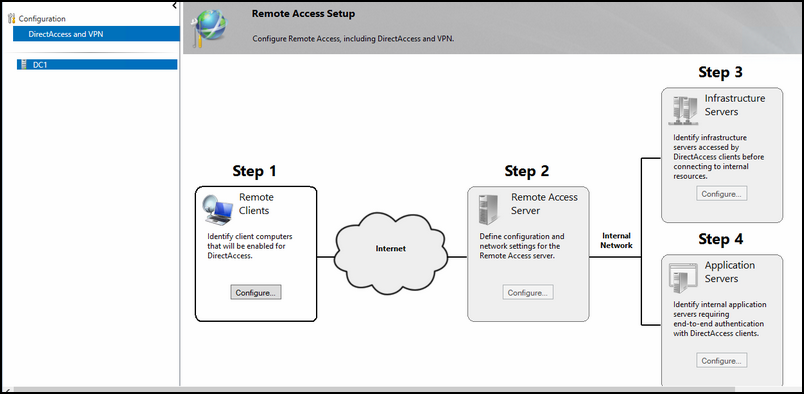
Configuring of DirectAccess.
Configuration of DirectAccess is done in 4 steps like shown in the above figure; the steps 1 till 4 is as followed:
Step 1
Select the first option; that is what you want.
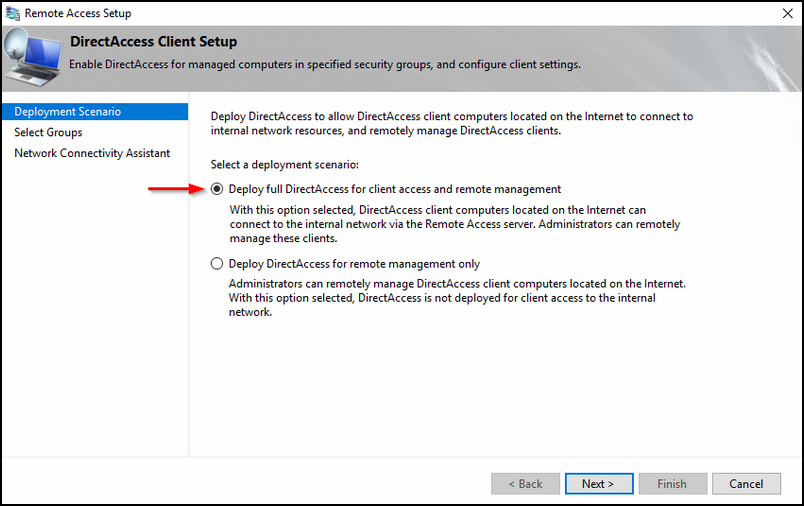
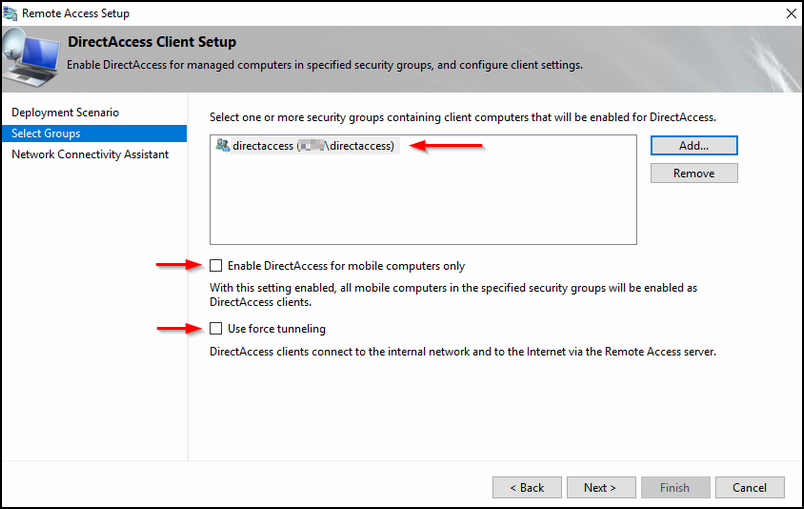
Select a security group by clicking Add; I would suggest that you first select a specific group for testing purposes that only have DirectAccess test workstations.
You can always change afterwards it to something else; like for example Domain Computers; but keep in mind that you always must use the wizard like the one below (figure 18). Altering the GPO directly will have negative effects.
Also make sure that both check boxes are NOT selected.
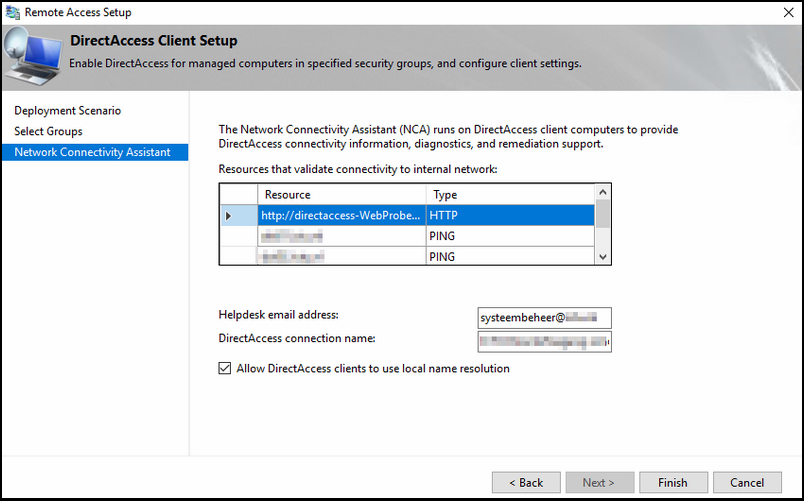
Fill in the blanks; I would suggest that the resources validation check would be consisting out of the following:
Reaching the web probe on HTTP
Pinging to servers; for example two domain controllers.
Also fill in the helpdesk email address and the DA connection name; that name will be visible in the Network & Sharing Centre and make sure that the local name resolution is checked.
Step 2.
Fill in the name for your DirectAccess service; this URL will be used for the DA clients to connect to.
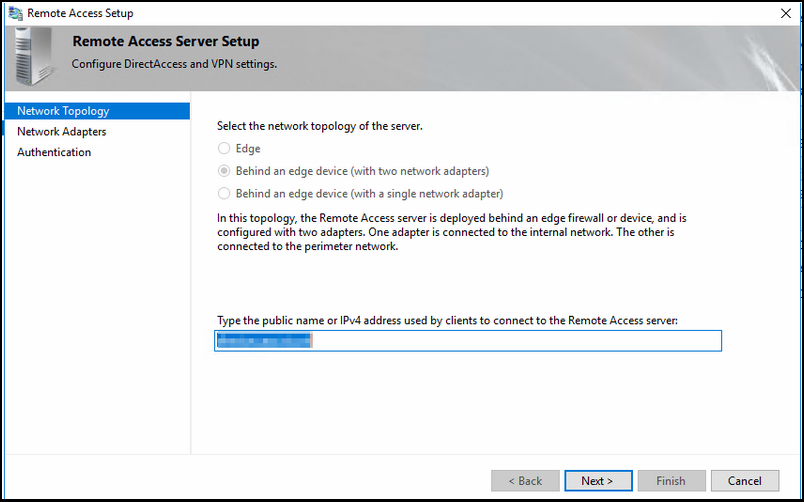
During installation; you have imported the certificate already in the computer personal store, if not; follow this article how to do this
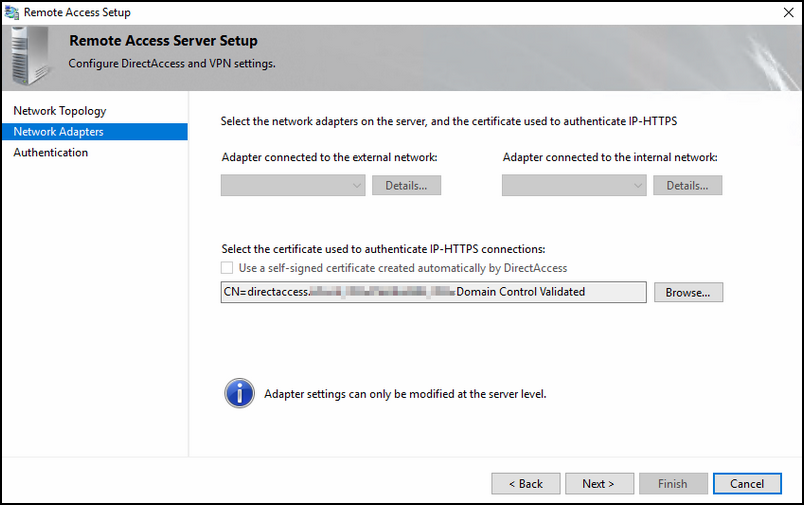
Once you have imported the SSL certificate for DirectAccess to use, choose the correct adapters for internal and external connections.
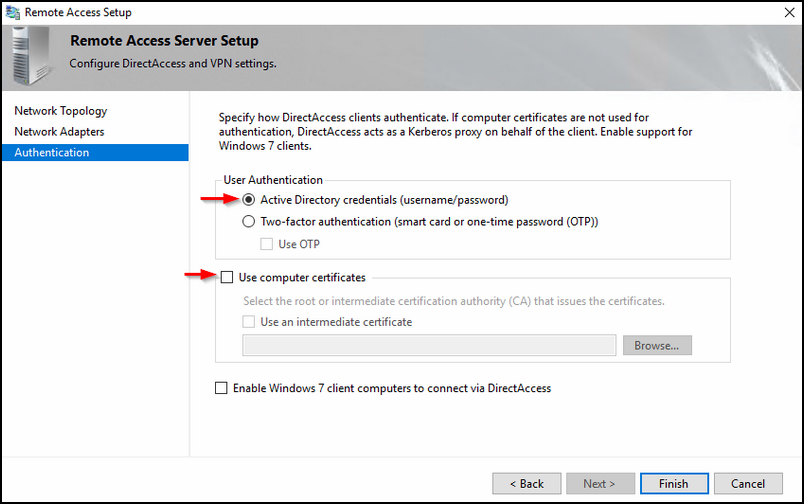
Select the option 'Active Directory Credentials (username/password) and make sure the "use computer certitifcates'' is unchecked. The last one can be enabled if you use windows 7 clients; this has to do with the WMI filter that would be enabled on your DA policy.
Step 3
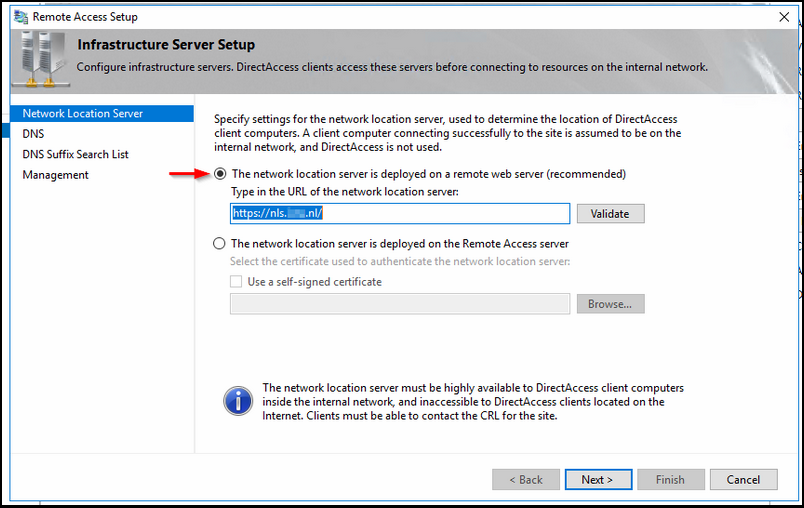
Fill in the NLS URL and validate it. this URL will be installed on the NetScaler.
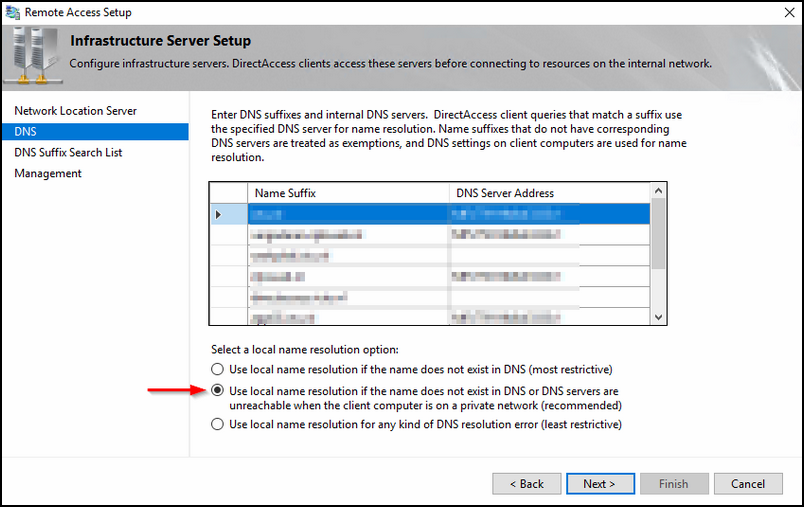
Here you must select the interesting traffic for to be put in the DA tunnel and what specifically not.
Before adding name suffixes; choose the 2nd of local name resolution options.
This is how it works:
To add a line; scroll down until you see the asterisk
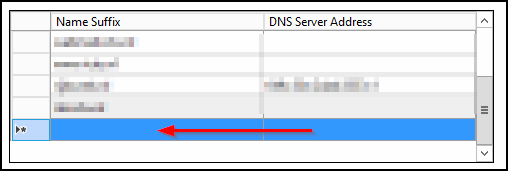
Doubleclick on the empty line and you see the follwing screen
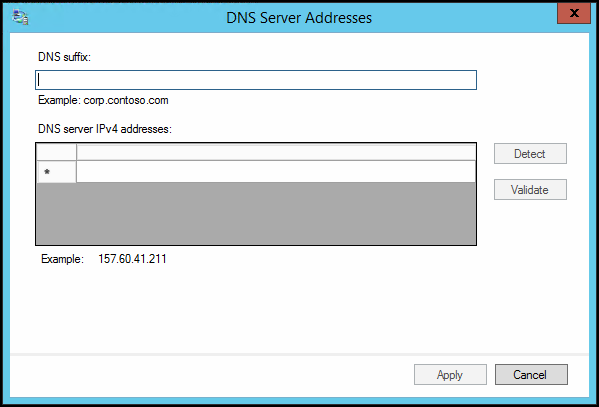
If you want that the traffic for a specific URL must be tunneled over the DirectAccess tunnel, you must do the following:
Fill in the URL
Click on Detect; you'll notice under the RED ARROW that the DNS64 address will be filled in with a IPv6 address (to be specific the DNS64 address of DA.
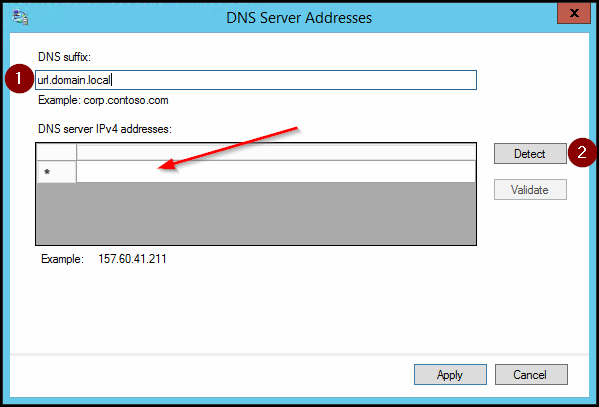
NOTE: If you add a line without a DNS server, thus filling in the URL and click directly on Apply; the DirectAccess tunnel will not be used for that URL and local name resolution will be applied.
|
Leave this default; don't change anything, unless you have more DNS suffixes that you use within your organization.
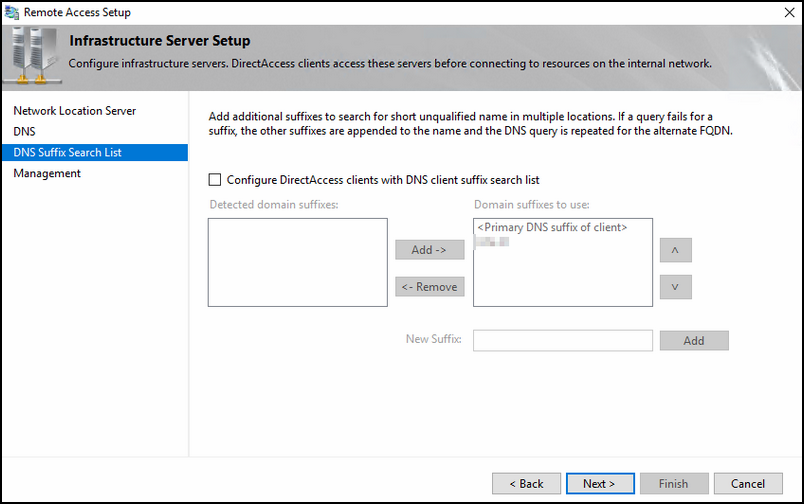
The management section; you can fill in a SCCM server for example for remediation.
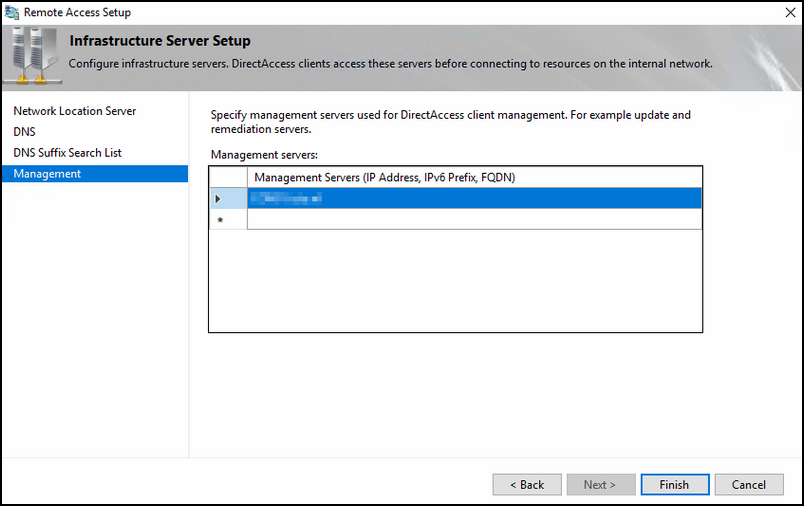
Step 4
Let this one default.
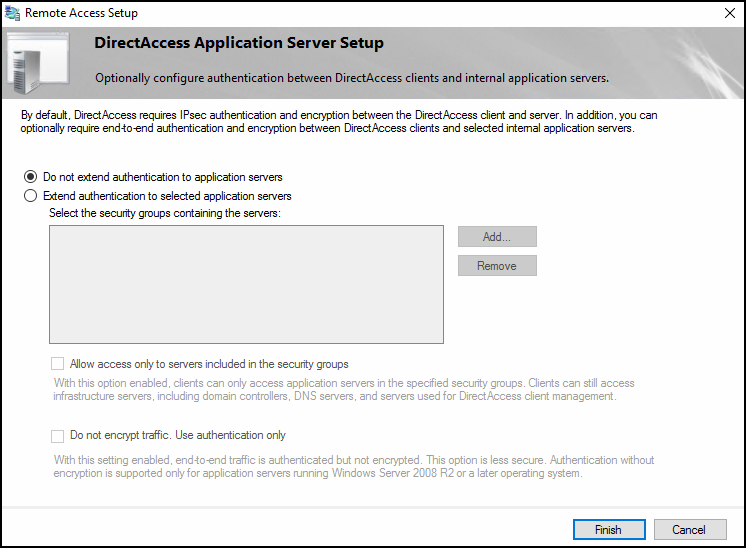
So that's it for the DirectAccess setup (woohoo!) now lets continue by enabling External Loadbalancing.
Enabling External Loadbalancing
Before I start telling how to configure load balancing, you must make sure that the DirectAccess certificate is present in Computer Personal store of your SECOND NODE (!)
After this; enable the load balance feature.
For enabling external loadbalancing I followed the article How to Configure DirectAccess in Windows Server 2012 to Work with an External Hardware Load Balancer.
I grabbed 90% from the above link, but in the last 10% I adjusted slightly to make it fit for your DirectAccess Setup.
Configure your DirectAccess environment for use with the external hardware load balancer, we perform the following step:
1. Logon to the DirectAccess server that is currently in operation. This will be Node1. Launch the Remote Access console to begin the DirectAccess configuration.
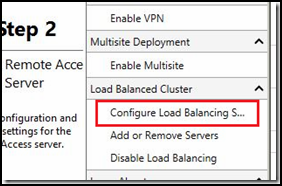
2. From the right-most pane, select “Configure Load Balancing”
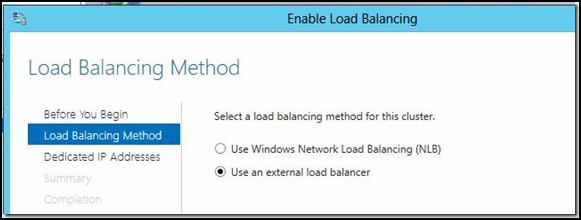
3. Selection the option for “Use an external load balancer” and click “Next”
4. The wizard will ask for a new dedicated IP address for Node 1. The existing dedicated IP address will be used as the virtual IP address of the load balancer to avoid requiring any DNS changes as a result of this process.
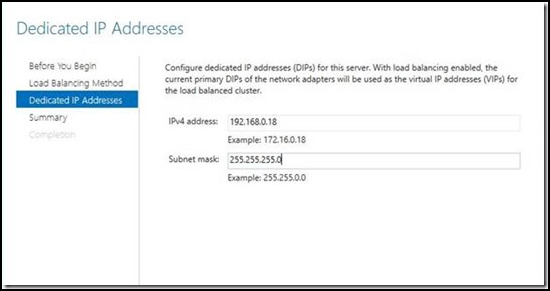
If you receive the error message “Either the server is configured as an ISATAP router or no IPv6 addresses were detected on the internal adapter on the server. This is not supported in a cluster configured to use an external load balancer. Either deploy IPv6 in the internal network, or deploy an external ISATAP router, and configure IPv6 connectivity between the router and the Remote Access server”, then head over to Microsoft Support to obtain a hotfix that will resolve the issue. Once the hotfix has been applied, run through the steps again.
|
5. Click “Next” to proceed to the Summary page and then click “Commit” to apply the changes.
6. Upon committing the changes, you will see a warning message regarding ISATAP:
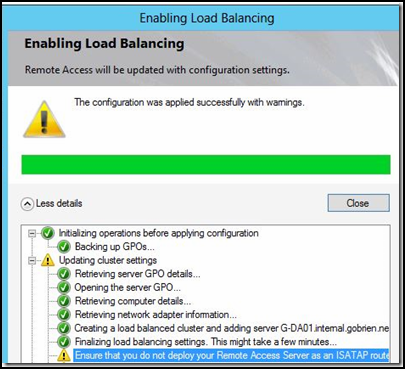
This warning occurs because we may not be able to use ISATAP on the DirectAccess server any longer. In this scenario, there are two options: place an external load balancer that supports ISATAP on the internal network and enable ISATAP on either DirectAccess servers, or disable ISATAP completely which then disables the “manage-out” functionality of DirectAccess.
7. Now head over to your second DirectAccess server and configure the Roles and Features to add the Remote Access components.
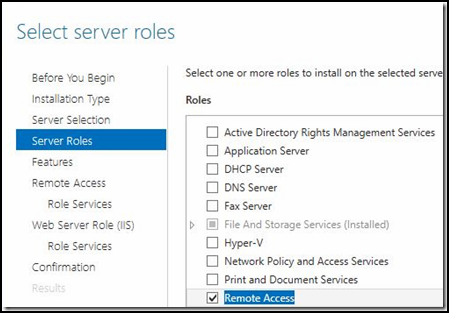
8. Once the Roles and Features installation is complete, be sure to import the IP-HTTPS certificate used in the initial DirectAccess configuration into the Computer Store of the second DA server. (A self-signed certificate will not work in this scenario)
9. Now head back to first DirectAccess server and open the Remote Access console.
10. Look for the option to “Add or Remove Servers” in the right pane
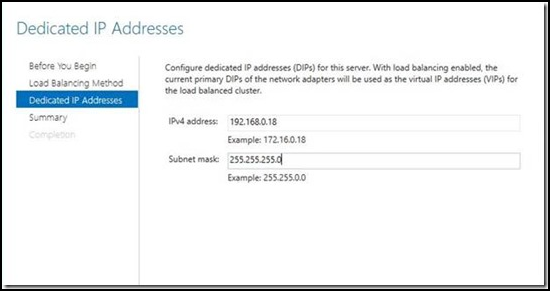
11. Type in the name of Node2 and click “Next”
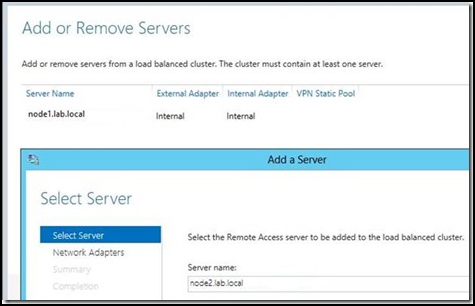
12. Now select the Network Adapters for External and internal use and the IP-HTTPS certificate that Node2 will be using:
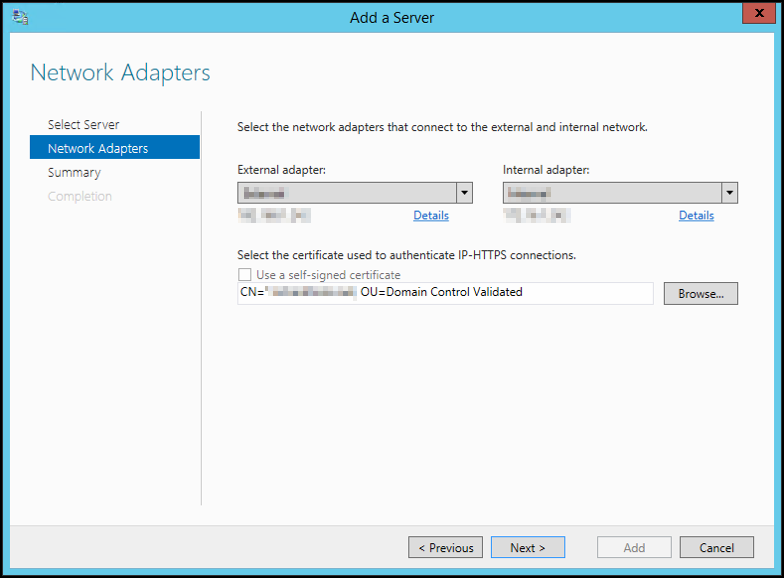
13. Click “Commit” and then close to apply the configuration.
14. Once the configuration is complete, you can click on the “Operations Status” link in the console to check the status of the array.
Once the load balancer can communicate with both nodes, they should turn green with a check mark.

And with that all completed, we have a Dual-NIC DirectAccess 2012 deployment with external load balancing!
So that's it for the DA config; let's move to the Citrix NetScaler config
Configure Citrix NetScaler for DirectAccess load balancing and reverse proxy
From here I will show how to configure the DirectAccess infrastructure in to your Citrix NetScaler.
First; create the real servers. Go to traffic management -> Load balancing -> Servers and click Add
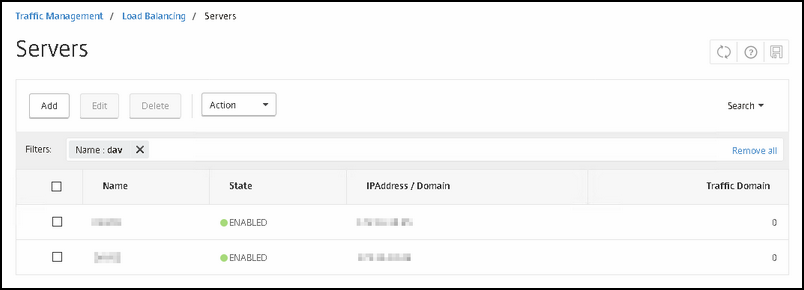
Fill in the FQDN name so that you can recognize it easily and its IP address to where the NetScaler will connect to; in our case, this must be the External IP of the DirectAccess server. After that, click OK and repeat the steps for the seconde Node.
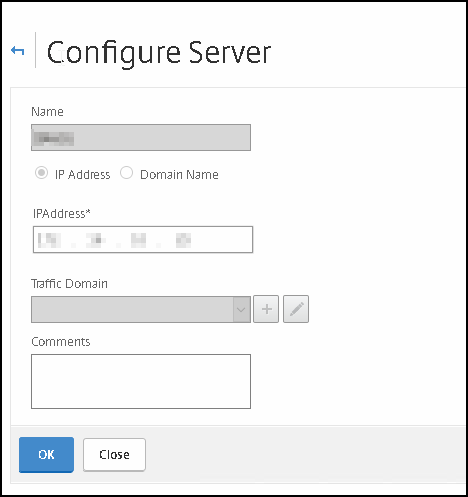
Before we create the service groups; me must make sure that we have created the SSL profiles.
Go to System -> Profiles -> SSL Profile and click on the SSL Profile Tab.
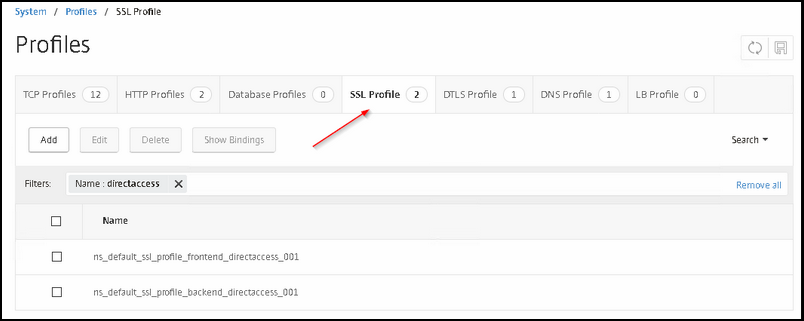
Now create two SSL profiles;
one for the front-end connections towards the clients
one for the back-end connections towards the real servers.
That way we can easily change an SSL profile that is configured for multiple VIPS, if for example a cipher suite gets depreciated in the future for some reason.
The first profile that we will create is used for Front end facing connections.
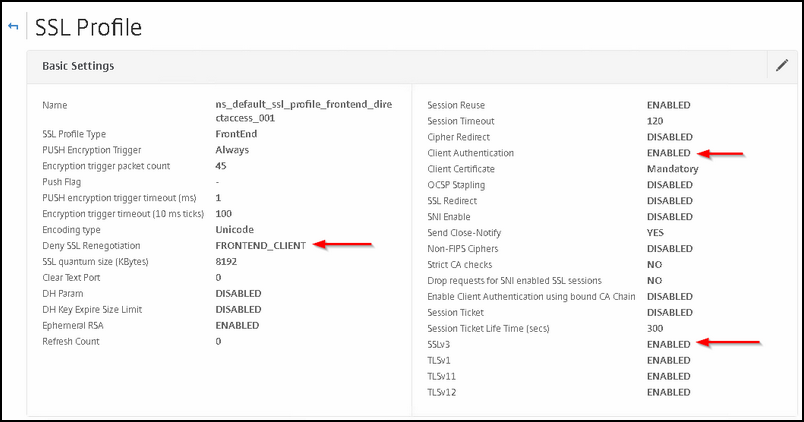
Compared to the standard front end profile; adjust the following settings:
Deny SSL Regeneration: Frontend_Client
Client Authentication: Enabled (will come back on that one later)
SSLv3 (What?! Yes, this is important for Windows 10 Clients, remember the part about NULL encryption?)
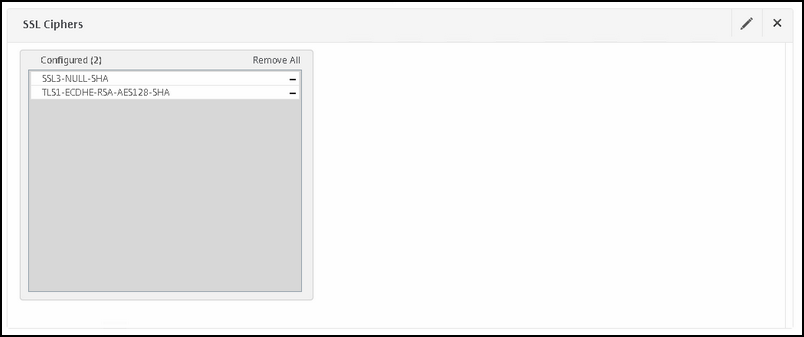
Deselect ALL CIPHERS (!) and choose only two:
SSL-NULL-SHA
TLS1-ECDHE-RSA-AES128-SHA
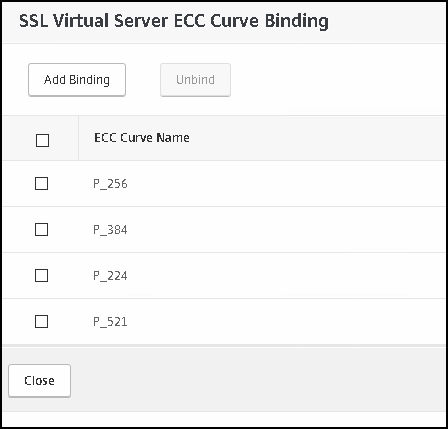
ECC Curves are left default; but for the completeness here is the picture:
Next we will create the SSL profile that will be used as the back end facing one; lets create it.
Here it is important to enable SSLv3 and disable all TLS protocols:
SSLv3: ENABLED
TLS1: DISABLED
TLS1.1: DISABLED
TLS1.2: DISABLED
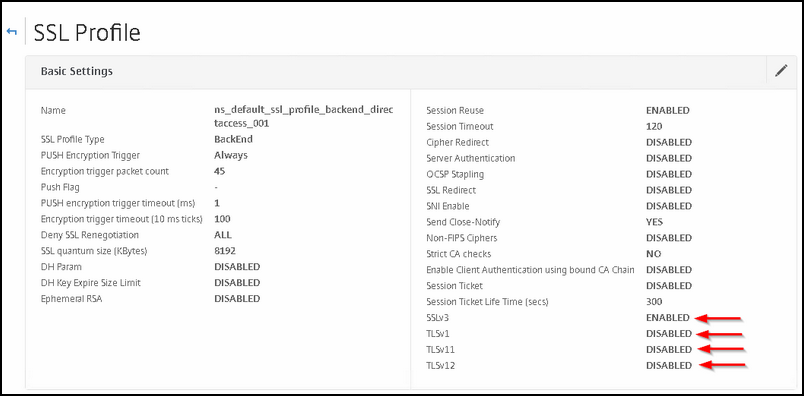
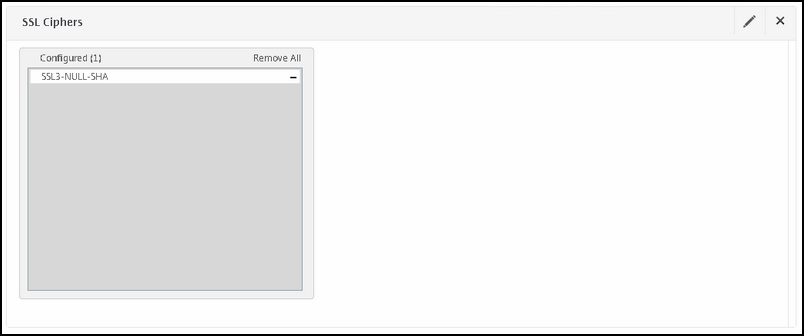
After that, disable all cipher suites and add SSLv3-NULL-SHA :
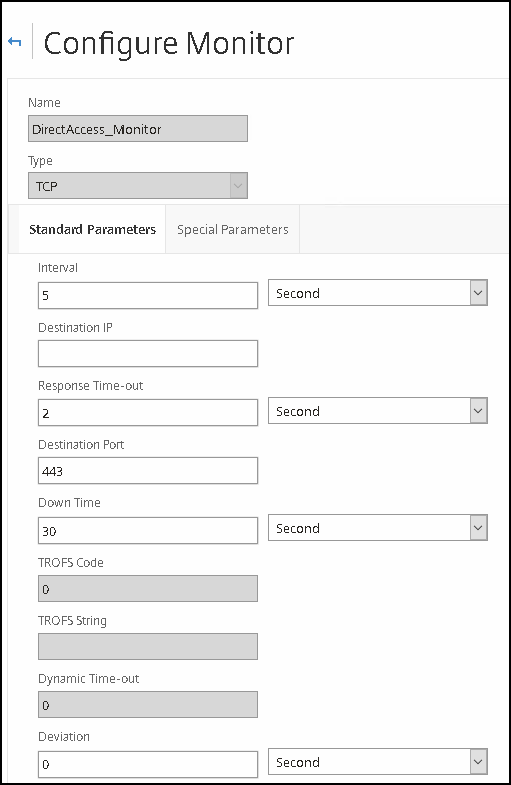
Now let's create a monitor for the NetScaler so that it can perform health checks of each DirectAccess server.
Go to Traffic Management -> Load balancing -> Monitors

Configure as followed:
Type | Value |
|---|---|
Type | 5 seconds |
Interval | 5 seconds |
Response timeout | 2 seconds |
Destination port | 443 |
Down time | 30 seconds |
Deviation | 0 seconds |
Retries | 3 |
Response time-out threshold | 0 |
Success retries | 1 |
Failure retries | 0 |
Enabled | Check |
LTRM | Check |
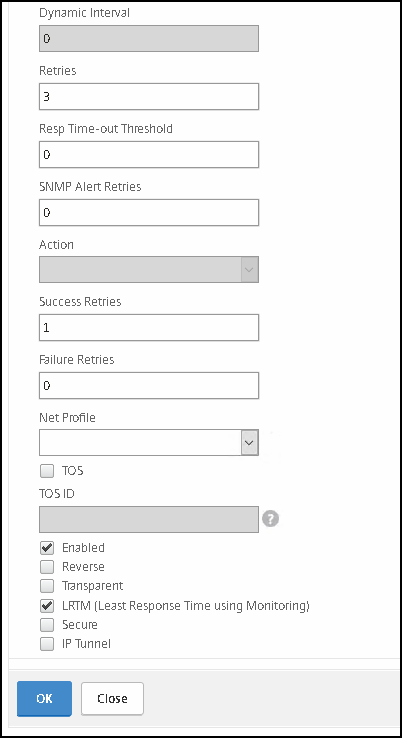
After that; we will create two service groups;
One for SSL connections
One for HTTP connections (like the webprobe).
Go to Traffic Management -> Load Balancing -> Service Groups
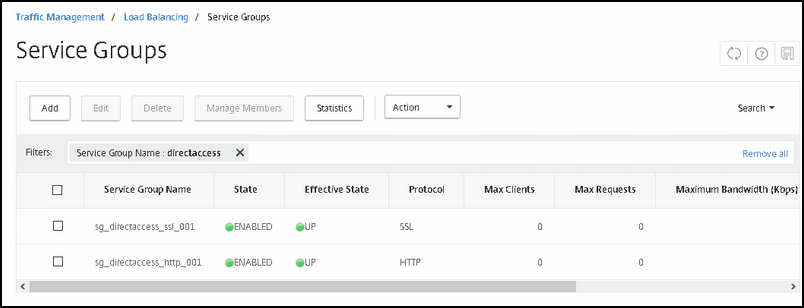
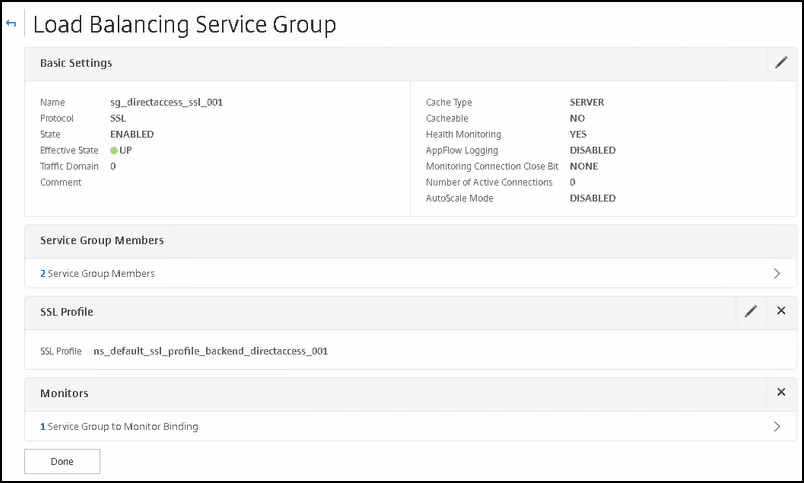
First we will create the service group for SSL connections
Type | Value |
|---|---|
Protocol | SSL |
Service group members | DirectAccess Real server 1 |
SSL profile | The back end profile you created earlier |
Health Monitor | The DA monitor we created earlier |
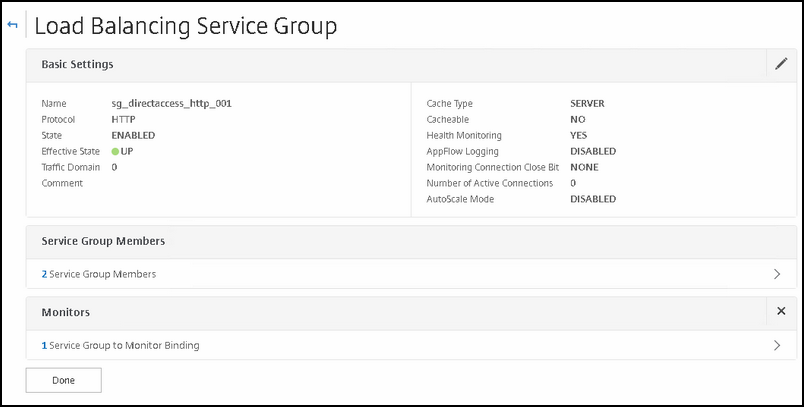
Now create the service group for HTTP connections
Type | Value |
|---|---|
Protocol | HTTP |
Service group members | DirectAccess Real server 1 |
Health Monitor | The DA monitor we created earlier |
No we can create the VIP's and configure them appropriately.
Go to Traffic Management -> Load Balancing -> Virtual Servers
NOTE: The VIP with NLS in its name is the one I created by following Richard Hicks thread on his Blog, you can follow the article that Richard Hicks posted; I won't elaborate on that one.
|
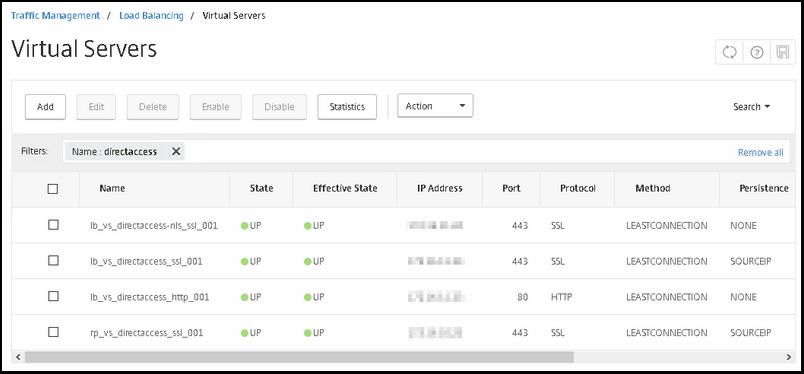
As you maybe can remember, i have created four VIPS.
1st VIP is for Network Locations Services
2nd VIP is for DirectAccess SSL client connections that come from the inside (will explain it below)
3rd VIP is for DirectAccess HTTP connections, like the DirectAccess-webProbeHost
4th VIP is for DirectAccess SSL client connections that come from the internet
The SSL VIP is for load balancing client connections that originate from within the organization; in case you have a two armed NetScaler setup and want to have an extra layer of security for secure connections from example Wi-Fi notebooks, then you can use this (this also needs some configuration to block certain traffic so that the clients thinks it is outside / not on premise and connects to DA servers; elaborate on that one later)
Create the first VIP for internal load balancing DirectAccess client connections.
Type | Value |
|---|---|
Name | You can take over my naming convention |
Protocol | SSL |
IP Address | your VIP address |
Service group | Select the service group that you created earlier. |
Certificate (SERVER) | The DirectAccess certificate that you will use for client connections |
Certificate (CA) | Tthe VIP needs to have the PKI CA certificate configured so that it can authenticate the users who are trying to gain access to the DirectAccess resource that is protected over SSL; we call this: Mutual SSL Authentication |
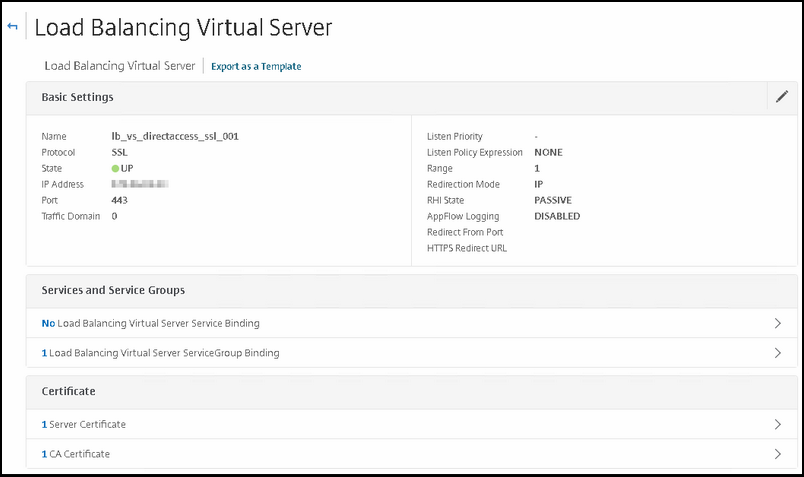
Here you can see a brief explaination how client certificate verfication works.
In SSL profile for front-end clients we enabled the Client Authentication.
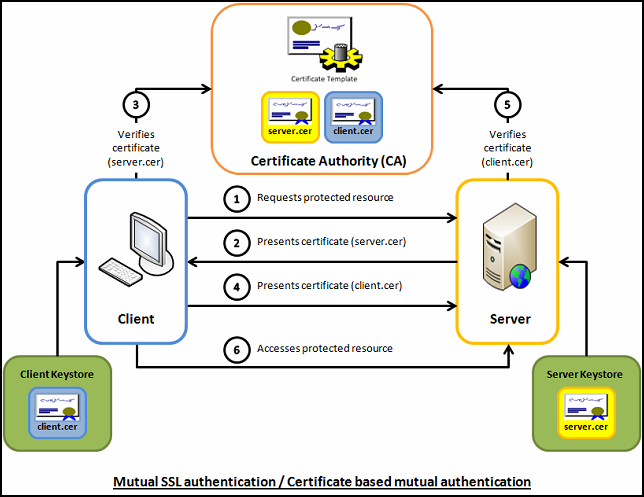
Settings for the SSL profile settings.
Type | Value |
|---|---|
SSL Profile | The Front-end profile you created earlier |
Persistence: |
|
Method: | Source IP |
Time-out | 30 minutes |
IPv4 Netmask | 255.255.255.255 |
NOTE: Persistence is important, otherwise you will sometimes see the same user with connection to both DA servers, thus making manage-out very difficult if not impossible. By using persistency, you can resolve this.
|

Now create the VIP or the DirectAccess client connections when they are not on premise and it looks the same as the inside VIP.
Below the settings for your VIP:
Type | Value |
|---|---|
Name | You can take over my naming convention |
Protocol | SSL |
IP Address | your VIP address |
Service group | Select the service group that you created earlier. |
Certificate (SERVER) | The DirectAccess certificate that you will use for client connections |
Certificate (CA) | Tthe VIP needs to have the PKI CA certificate configured so that it can authenticate the users who are trying to gain access to the DirectAccess resource that is protected over SSL; we call this: Mutual SSL Authentication |
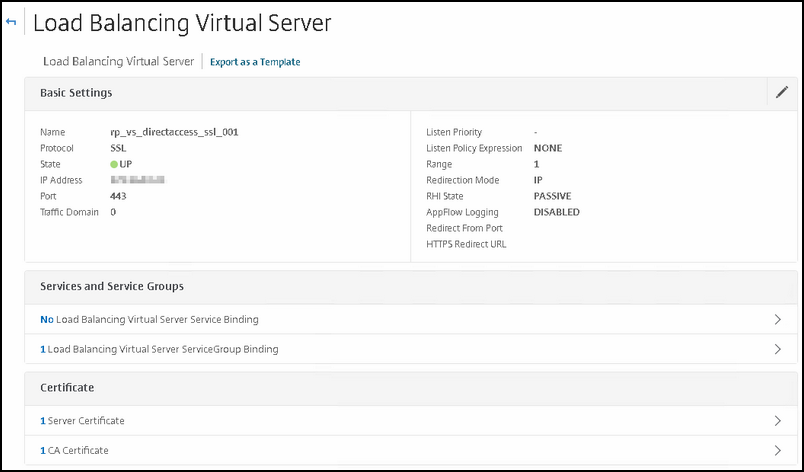
Configure the SSL profile and Persistence the same as the settings below:
Type | Value |
|---|---|
SSL Profile | The Front-end profile you created earlier |
Persistence: |
|
Method: | Source IP |
Time-out | 30 minutes |
IPv4 Netmask | 255.255.255.255 |

Let's create the VIP the HTTP connections:
Below the settings for your VIP:
Type | Value |
|---|---|
Name | You can take over my naming convention |
Protocol | HTTP |
IP Address | your VIP address |
Port | 80 |
Service group | The HTTP group we created earlier |
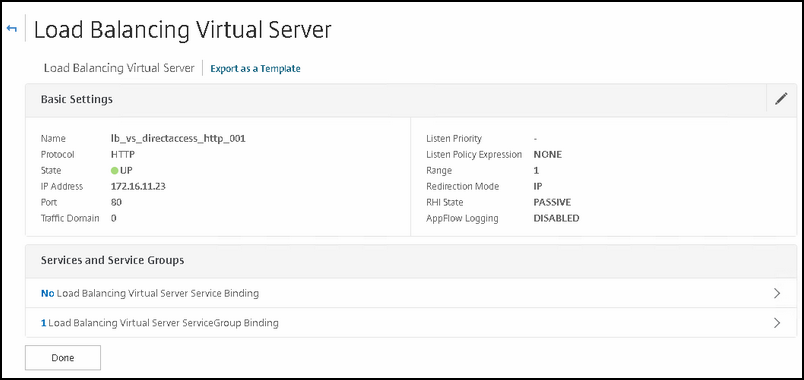
DNS records (internal)
Make sure that the following records are configured correctly:
Description (FQDN) | Type | IP Address |
|---|---|---|
Network Locations Services URL (nls.domain.local) | A record | IP address of NLS VIP |
DirectAccess services URL internal (directaccess.domain.local) | A record | IP address of internal SSL VIP |
DirectAccess-WebProbeHost | A record | IP address of internal HTTP VIP |
DirectAccess services URL external (directaccess.domain.tld) | A record | IP address of external SSL VIP |
That's it; where done here. Now you can test DirectAccess by first deploying the policy that DirectAccess created automaticly during installation to your mobile workstations (make sure that they are member of the security group you choose earlier) and that the GPO is loaded on the workstation.
Sit back; grab a cup of coffee and enjoy the DirectAccess ride ![]()
But wait a minute, what about the RED F on SSLLabs.com ?
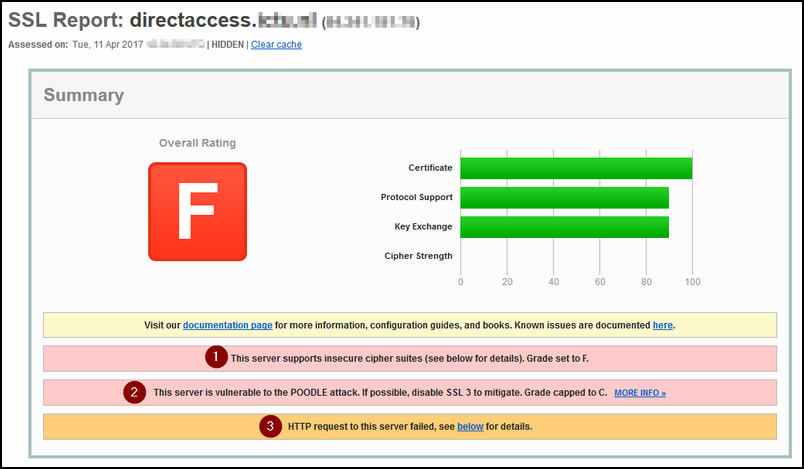
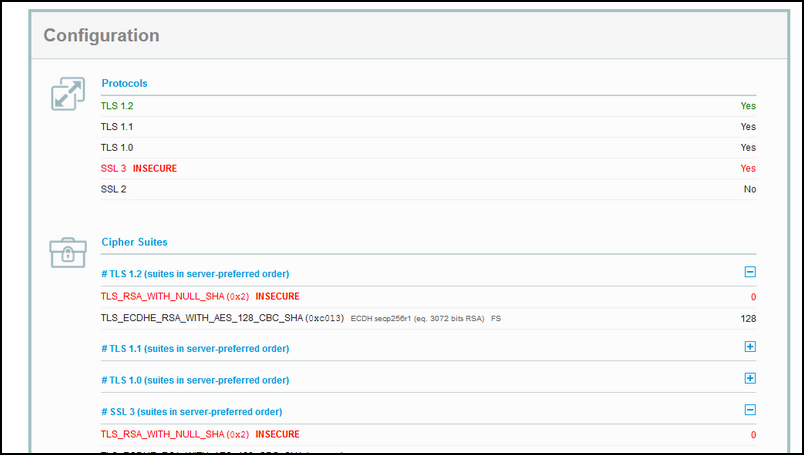
Yes, that is true, I said earlier that it would come back on that one.
The Thick Red F is based on a few things:
1. The insecure NULL cipher suite that is available for use, though we need it for Windows 10 clients.
2. By using SSLv3, the server is vulrneralbe for POODLE attack, but again, we need this protocol for the Windows 10 clients.
3. We did our best by requesting a Client Certificate before the connection can be established, thats why the HTTP request failed (and that is a good thing :) )
So there is no risk for POODLE attacks of man in the middle attack if you made sure that:
1. The certificates that you issue to your computer clients are protected by SHA256
2. Exporting them is prohibited.
More about F rating on Richard's blog here.
And what about the SSL for internal purposes?
You can choose to force internal WiFi laptops accessing your resources via a DirectAccess tunnel, to put a extra security layer on top the existing one you use for WiFi (assuming that you are not using Open wifi opcourse ![]() )
)
To accomplish, you must only make the VIP available for HTTPS connections to directaccess.domain.tld. The other VIPS like DirectAccess-WebProbeHost and the Network Locations Services VIP should not be accessable, otherwise the clients sees that is on premise and does not try to create a DirectAccess Tunnel
Oh before I forget to mention, look at my other post regarding ISATAP and the things that you should not do on your DirectAccess environment.
Thank you for reading!
