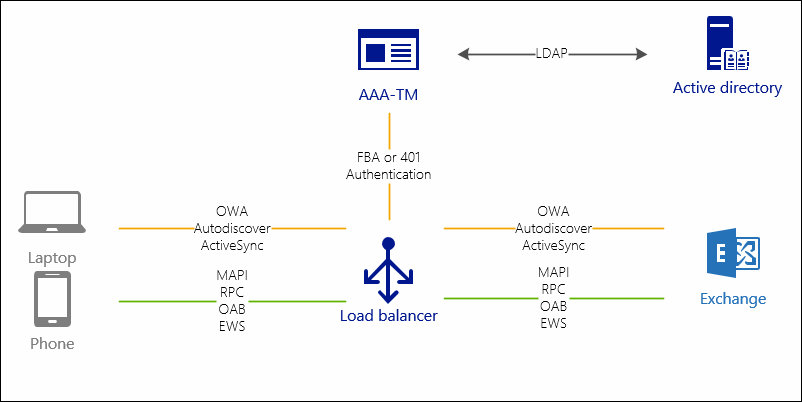
UPDATE 04-SEPT-2017: I discovered that by protecting Autodiscover with a 401-authentication; the Skype for Business client is not capable to utilizing this, resulting in not discovering EWS settings. Lack of EWS result in; no calendar information, no free/busy information etc. So my advice is not to protect Autodiscover with a 401-authentication if you are using Skype for Business. If not; leave it on; your Outlook Client can handle this.
If you try to search on 'Exchange with NetScaler' ; you will probably wind out on the following:
Citrix Article Load balancing Microsoft Exchange 2016 with NetScaler by Citrix
Load Balancing Microsoft Exchange 2016 with Citrix NetScaler by Vikash
Load Balancing Microsoft Exchange 2016 On Citrix NetScaler 11 by Jesse Boehm
The thing is that these article are in my opinion not complete; it does what the title says it does; load balance Exchange with NetScaler. But if you want to do more with NetScaler like handling AAA… you are in a challenge; probably searching on the web for scraps of documentation how to accomplish a proper load balance configuration with use of the AAA function within NetScaler. The AAA function is a cool feature that you can use to offload the authentication mechanism at the NetScaler, while protection your front end of Exchange. In my opinion, FreeBSD does a better job on protecting you against HTTP/HTTPS/SSL exploits compared to Microsoft does for her Internet Information Services (IIS).
What you will find in this guide is complete walkthrough for configuring Exchange on your NetScaler. Although I have one server in my lab, you can do the same by just adding more servers to your service group(s) on your NetScaler; just like that. Also what you will find is a SSL A+ grade (more on this here on my other blog post) Outlook Web Access page with proper Cipher suites.
There are however prerequisites for this guide to have in place prior following it; my lab consists (and thus this guide is based on) of the following:
-
Exchange 2016 (probably 2013 as well)
-
Citrix NetScaler 11.1 with Enterprise license or higher
-
Windows Active Directory (Forrest and Domain level is not important for this guide)
-
Internet connection :)
-
(Good) coffee
Also this guide is ordered in a specific way because the some sections depend on the preceding action:
-
Create Cipher suite
-
Create SSL profiles
-
Create servers
-
Create Monitors
-
For AAA authentication server
-
Form SSO profile
-
Traffic Profile
-
Traffic policy
-
Session Policy
-
Session Profile
-
Authentication virtual server
-
LDAP servers
-
LDAP Policies
-
-
Create service groups
-
Create vServers
-
Create content switch
Cipher group
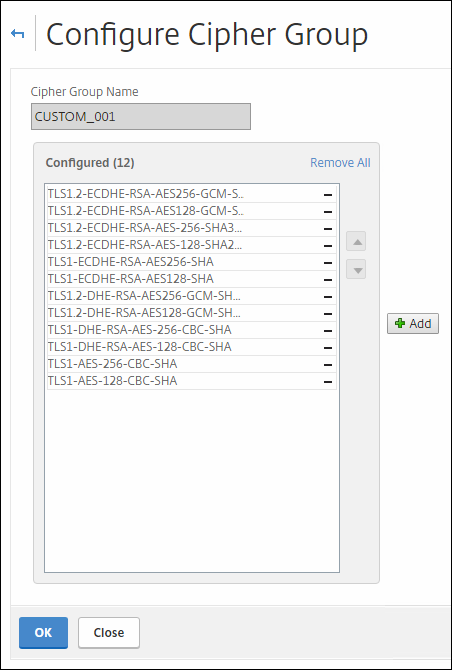
First we must create a proper Cipher suite to get a better security profile; it is important that the order of the ciphers as showed in figure 1 below, is maintained.
If you read this Citrix Blog; they also mention Cipher Name SSL3-DES-CBC3-SHA ; I removed that one, because it is classified as WEAK. Also SSL3 is disabled on the SSL profiles, so it is not worth mentioning it in your custom cipher group.
As per 26th of November, Qualys announced it will change its lab grading.
SSL profile
The SSL profile eases your administration; if you want to change something related to SSL to effect all; than this is what you want to use.
|
NOTE: If you want to use SSL Profiles, you must first enable default SSL profile (a link how to this). You must understand by enabling default SSL profile there is no way back, other than rebooting the NetScaler and ditching the changes. So once set and saved, you must revert the complete configuration to undo this change…
|
We will create in total 4 new cipher suites:
-
Backend communication to Microsoft Exchange
-
Backend communication to Windows IIS
-
Frontend communication for Content Switches
-
Front end communication for the Citrix vServers in the Load balancing section.
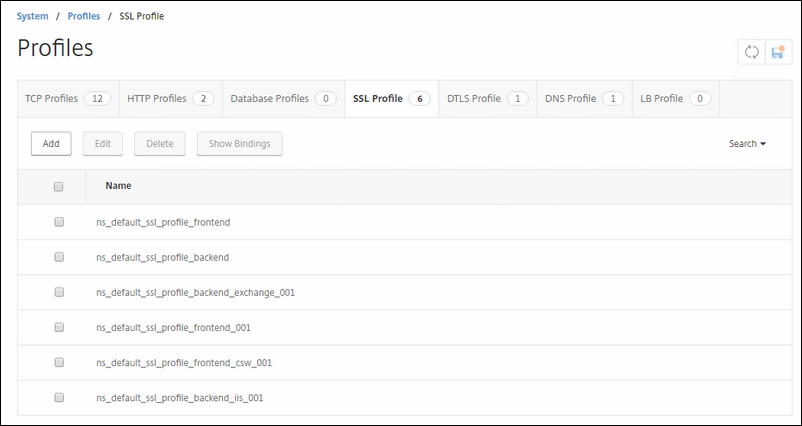
So go to System / Profile / SSL profile
Below you see I already created the necessary profiles, but i will walk you through them.
Checkmark the ns_default_SSL_profile_backend and click Add
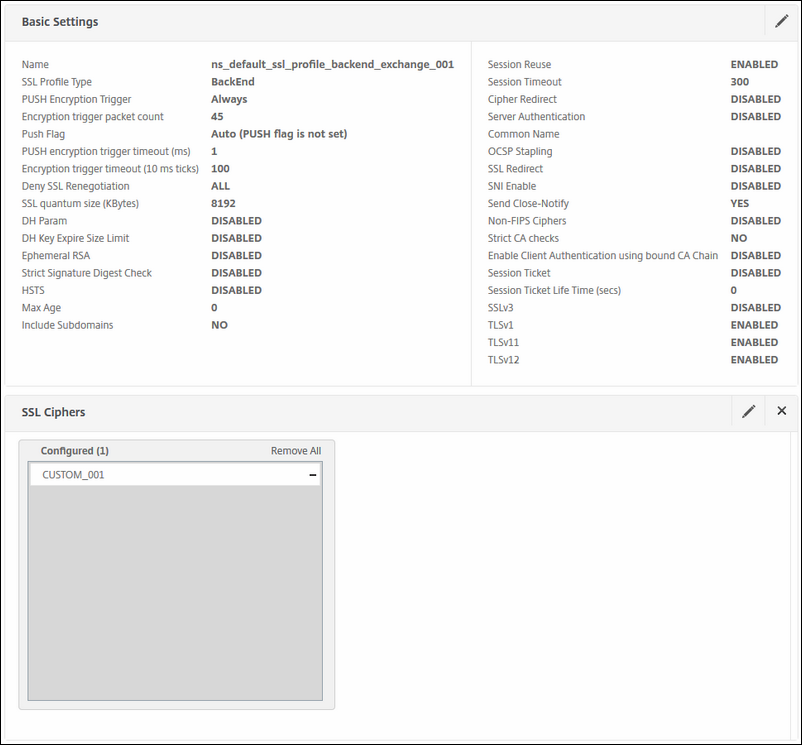
Do the following:
-
Disable SSLv3
-
Disable TLSv11
-
Disable TLSv12
-
Select the Custom cipher suite we created earlier
Why disabling TLSv11 and TLSv12 ?
This is because if you are on prior NS 11.0 build 65.35 or earlier you must also disable TLSv11 and TLSv12 due to the incompatibility between IIS and NetScaler. For more details, check this Citrix article Back-End Connection on TLS 1.1/1.2 from NetScaler to IIS Server Breaks.
If you are on NS 12.0 build 41.16 you can enable TLSv11 and TLSv12; Citrix fixed this in April 2017.
Like I explained earlier; we are going to create a backend SSL profile for IIS servers, just like we did for Exchange above.
Do the following:
-
Disable SSLv3
-
Disable TLSv11
-
Disable TLSv12
-
Select the Custom cipher suite we created earlier
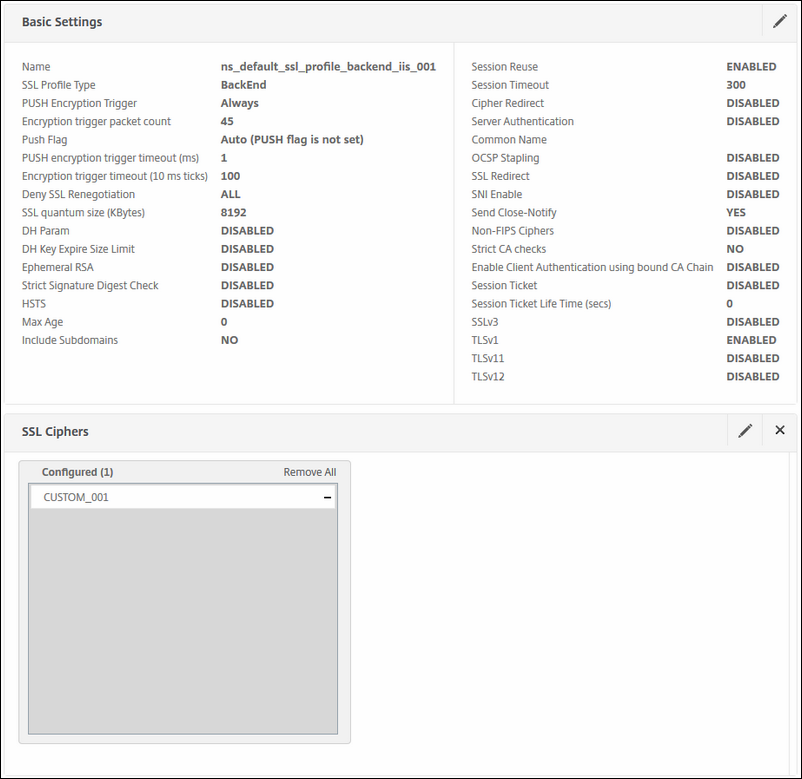
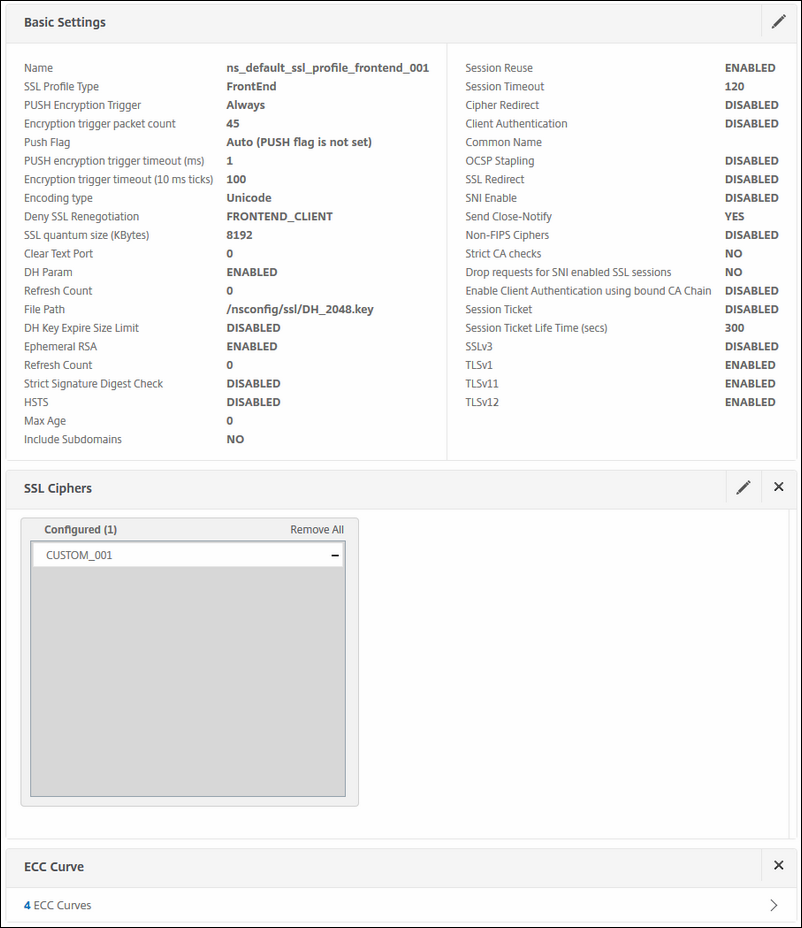
Next we will create the SSL profile for the front end connections. This profile will be bound to the Load balance vServers on the NetScaler that will serve the clients.
Change here the following:
-
Disable SSLv3
-
Enable TLSv1
-
Enable TLSv11
-
Enable TLSv12
-
Deny SSL Regeneration: FRONTEND_CLIENT
-
Configure the DH Key
-
Select the Custom Cipher suite, just as you did in the preceding SSL profile
-
Select ALL ECC curves
How do I setup a Diffie-Hellman key on NetScaler? To configure the DH key; you must walk through this Citrix Article
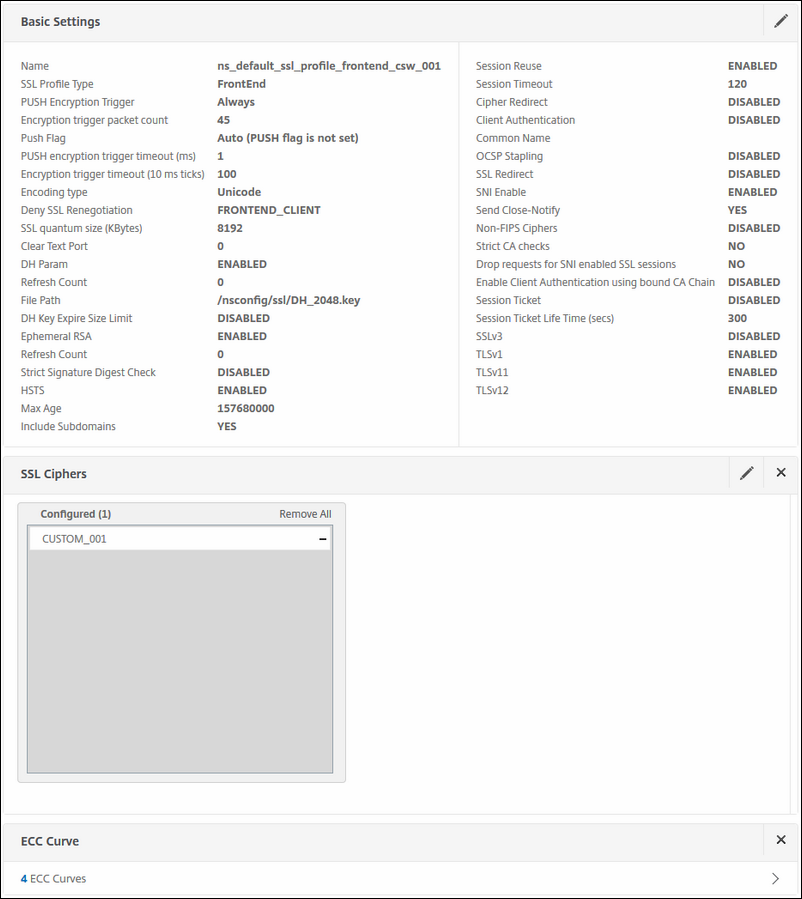
Next up is the SSL profile; it looks the same like the preceding front end SSL profile, only this one differs because the SNI is set to ENABLED. This is needed because when you use more than 1 certificate on your content switch; you have to make sure that SNI is enabled so that your vServer or vSwitch in this case can send the correct certificate to the correct request.
So configure the following here:
-
Disable SSLv3
-
Enable TLSv1
-
Enable TLSv11
-
Enable TLSv12
-
Deny SSL Regeneration: FRONTEND_CLIENT
-
Configure the DH Key
-
SNI Enable: ENABLED
-
Select the Custom Cipher suite, just as you did in the preceding SSL profile
-
Select ALL ECC curves
So were done here. Move forward to the Load balance servers
Create servers
Firstly we must create the servers we are landing on; in my case; I have only one Exchange server in my lab; so I will create only one. If you have more than one in your environment; also create appropriately; I will tell you later on how you must configure the load balance setting etc.
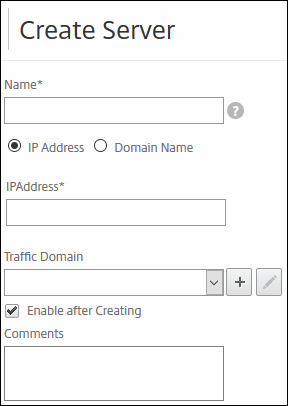
Go to Traffic Management / Load balancing / Servers
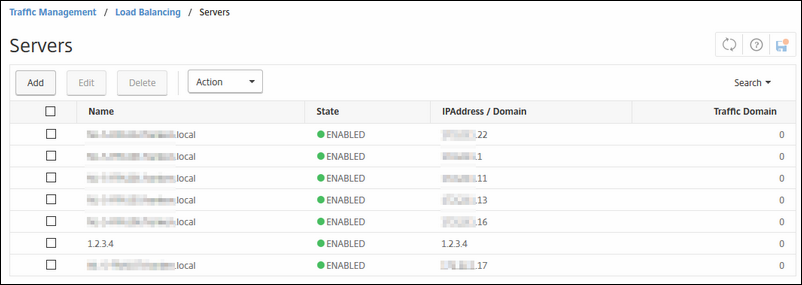
Create each real Exchange server you have as a server in the NetScaler.
Name: I would suggest to fill in its real FQDN; SERVER01.domain.tld
IP address: the real IP of the server that NetScaler can reach.
The rest is left default.
Create monitor
Now create the Monitor's that you will use to monitor if your Exchange functions are healthy.
KEMP wrote a very nice how to manual for configuring it on KEMP (I must admit, it is more complete than the one created by Citrix )
To make things easy; make sure the following health URI's are used:
SubVS Name Healthcheck URL
OWA (as in steps above) /owa/healthcheck.htm
Autodiscover /autodiscover/healthcheck.htm
ECP /ecp/healthcheck.htm
EWS /ews/healthcheck.htm
ActiveSync /microsoft-server-activesync/healthcheck.htm
OAB /oab/healthcheck.htm
RPC /rpc/healthcheck.htm
MAPI /mapi/healthcheck.htm
|
|
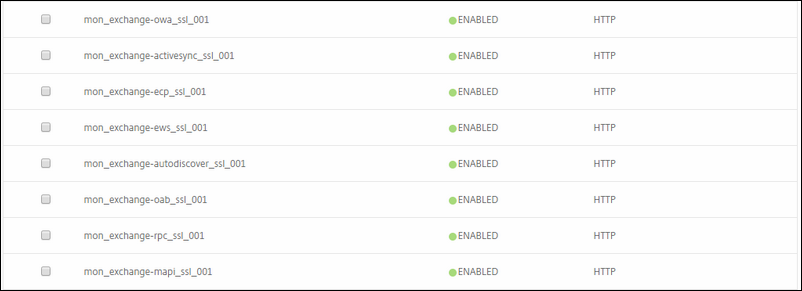
Go to Traffic management / Load balancing / Monitors
Create the first monitor that you we will use later for health checks on the Outlook Web Access and set everything like the below figures.
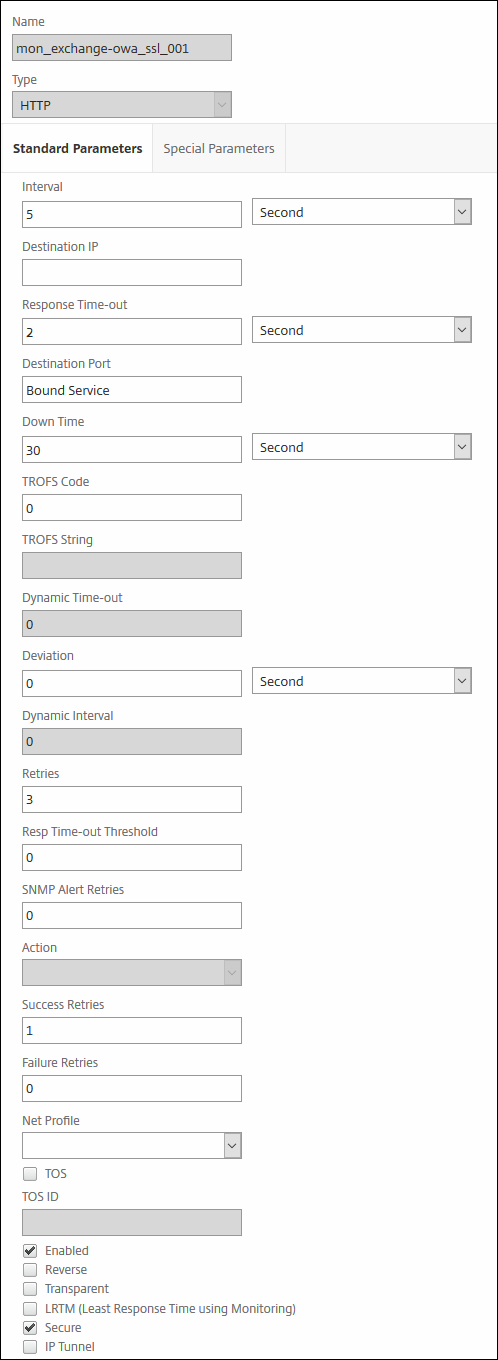
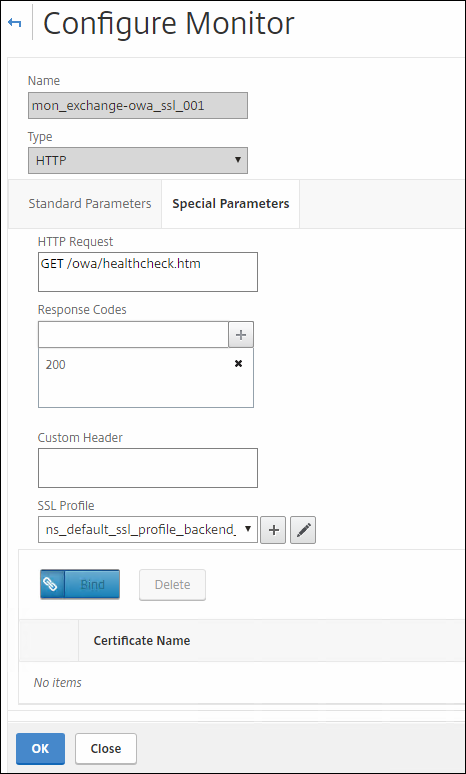
Now you must fill in:
HTTP Request: (in this case) GET /owa/healthcheck.htm
Response code: 200
SSL Profile: your SSL profile like in figure 4
Like I mentioned earlier in the SSL profile chapter, if you have NS prior 11.0 build 65.35, select a custom cipher suite that has TLSv11 and TLSv12 disabled.
If you are using NS11.0 build 65.35 or later; no worries here; leave it as it was. Same thing for NS 12.0 build 41.16.
Create Service Groups
Here you should create the Service Groups for all of the Exchange Services. You should create them separately instead on only 1 service or service group. That makes you more flexible in the future.
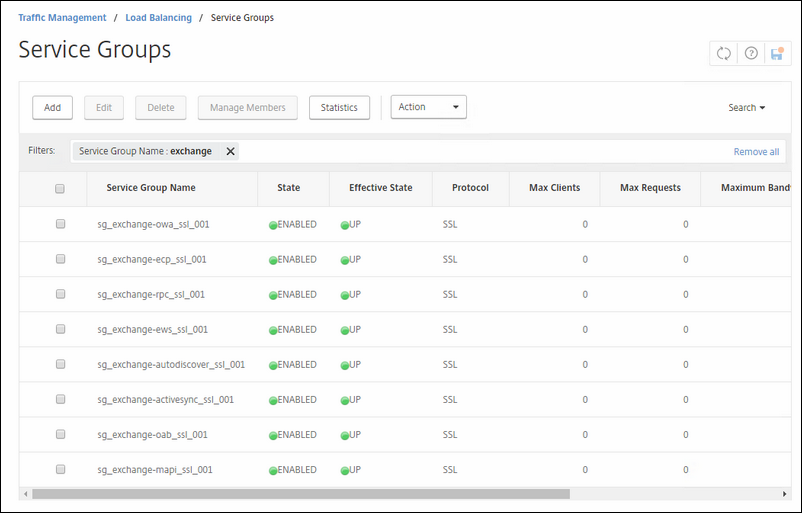
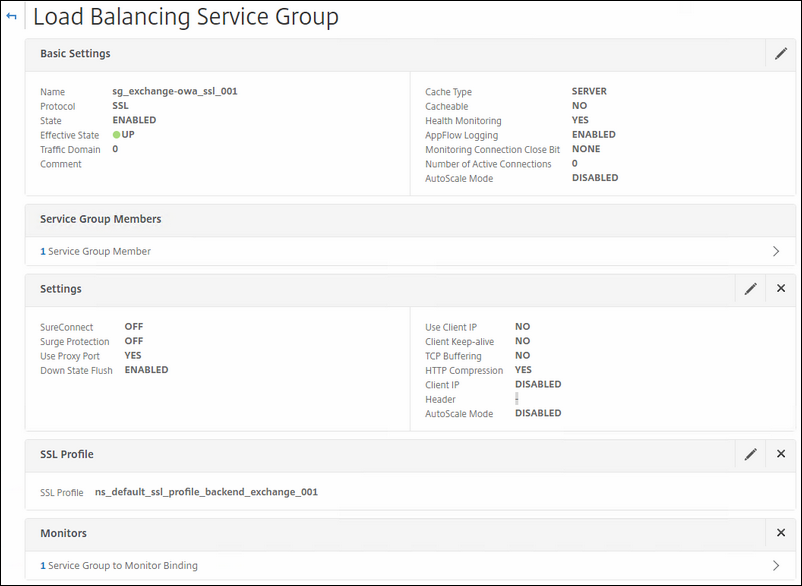
For every group pick a unique name for it so that you can recognize it later.
Also choose the Service Group Member(s). Choose the special created SSL profile for backend communication and last but not certainly least; choose the appropriate monitor you created earlier for the service
Create SSO profile form for OWA
One of the cool things that the NetScaler can do is that you can create a Single Sign On experience by letting the NetScaler 'fill in' a login form for you; how cool is that?! It is not literally filling in the username and password in the required fields like LastPass or a KeePass (plugin), but it sends the required fields in a POST action to the backend once the NetScaler validated the provided credentials to your LDAP or RADIUS environment; that doesn't mean that if your user is known via the LDAP query, it also has rights to access Exchange. It is my opinion very helpful that NetScaler validates the provided credentials, while protecting the front end of your Exchange environment. In my opinion NetScaler (and of course FreeBSD) can do a better job on security than Windows can do with IIS :)
But back to the configuration part; go to Security / AAA-Application Traffic / Policies / Traffic and click on the Form SSO profiles tab and click Add

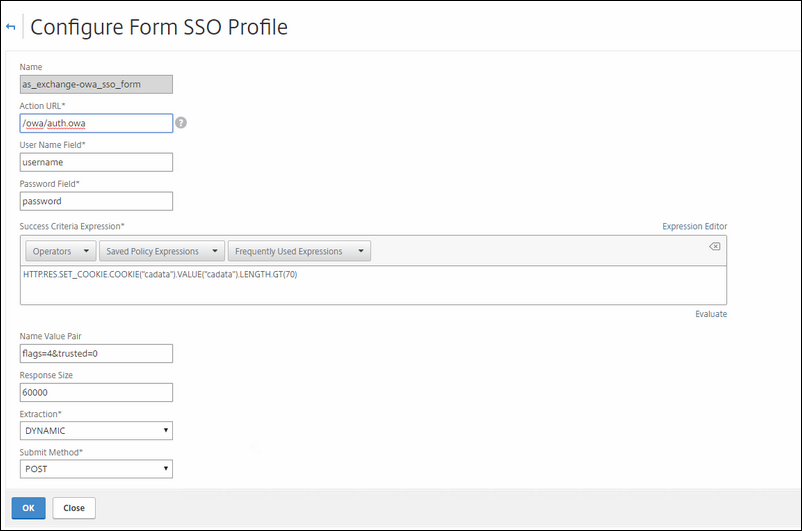
Fill in like I did in the figure below:
Name : as_exchange-owa_sso_form
Action URL : /owa/auth.owa
Username field: username
Password field: password
Success Criteria: HTTP.RES.SET_COOKIE("cadata").VALUE("cadata").LENGTH.GT(70)
Name value pair : flags=4&trusted=0
Response size : 60000 (VERY IMPORTANT, AFTER A CUMULATIVE UPDATE OF EXCHANGE, THE RESPONSE SIZE NEEDED TO BE BUMPED UP A FEW BYTES.)
Extraction : DYNAMIC
Submitted method : POST
Click on the Traffic Profiles tab, we will create 2 traffic profiles.
-
One for Logging in Outlook Web Access
-
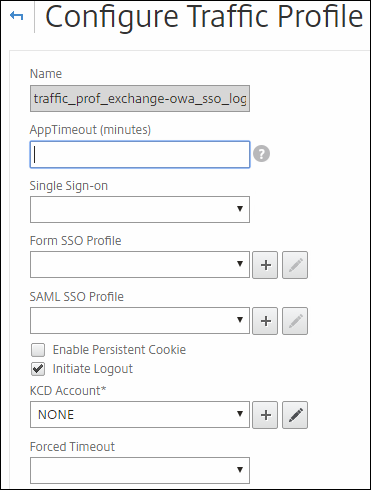
One for Logging out of Outlook Web Access when you punch the 'Log out' button in the top right corner ; we will use this one later in this guide
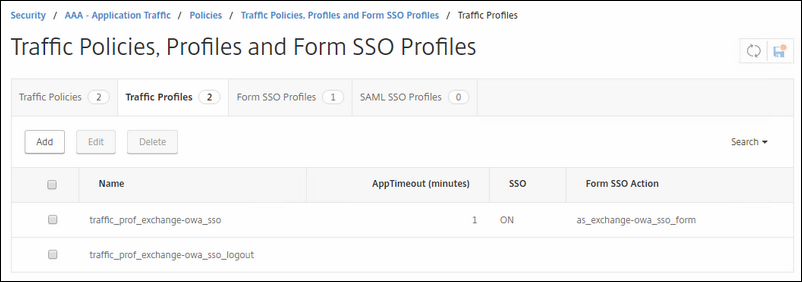
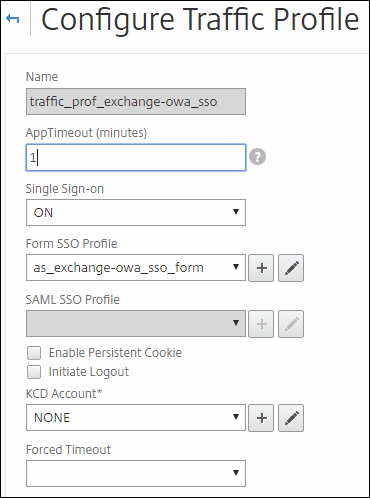
Fill in like I did in the figure below:
Name : traffic_prof_exchange-owa_sso
AppTimeout : 1
Single Sign On : ON
Form SSO: as_exchange-owa_sso_form (The form you created a few moments earlier)
This traffic profile is the one that tells the NetScaler what to do when you hit the log off button and recognizes the URI ; it will log you also of the NetScaler by ending your session.
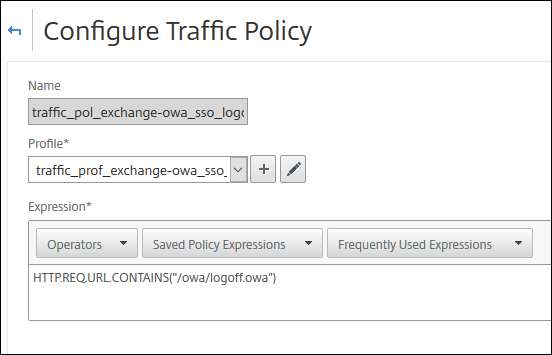
Now it is time to put the above SSO Form en two traffic profiles together in two traffic policies.
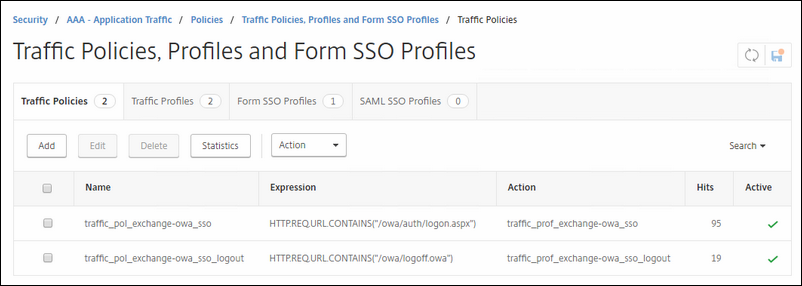
Name: traffic_pol_exchange-owa_sso
Profile: traffic_prof_exchange-owa_sso (the one you created a few moments earlier)
Expression: HTTP.REQ.URL.CONTAINS("/owa/auth/logon.aspx")
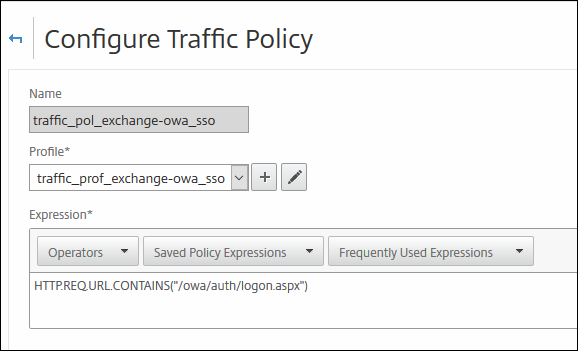
Name: traffic_pol_exchange-owa_sso_logout
Profile: traffic_prof_exchange-owa_sso (the one you created a few moments earlier)
Expression: HTTP.REQ.URL.CONTAINS("/owa/logoff.owa")
The NetScaler will recognize URI and close your session on the NetScaler when you hit the Logoff button in OWA; it will bring you back to your configured AAA webpage.
Create Session policy
Here we create a session policy that you will bind to you AAA server(s) you are going to use for Exchange.
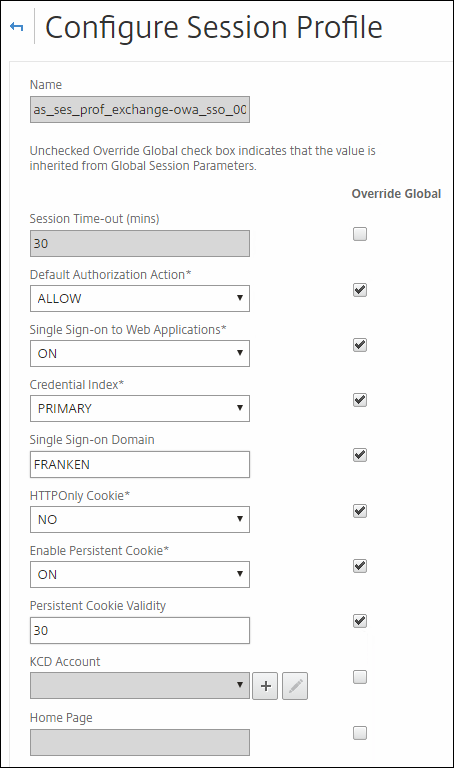
Go to Security / AAA-Application Traffic / Policies / Session and click on Session Profiles and click Add

Name : as_ses_prof_exchange-owa_sso_001
Check mark the following to override global configuration: 2,3,4,5,6,7,8 (like the figure below :) )
Then set like wise the figure below;
Default Authorization Actions : ALLOW
Single Sign On : ON
Credential Index: Primary
Single Sign-ON Domain : VERY IMPORTANT; THIS IS YOUR PRE-WINDOWS 2000 DOMAIN NAME (!)
HTTP only Cookie : No
Persistent cookie validity : 30
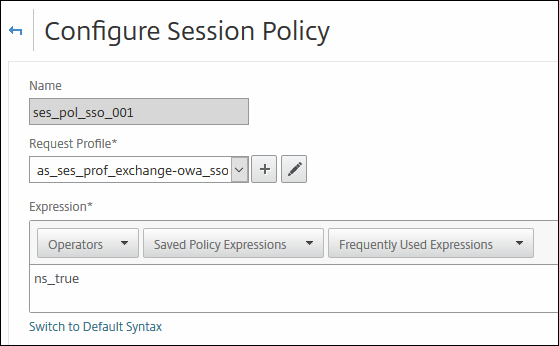
Next create the Session Policy ; click add.

Name : ses_pol_sso_001
Request profile : guess what, this is the one you created earlier :) )
Expression: ns_true
Create Authentication Virtual Server(s)
Now it is time to create the AAA server(s) for Exchange.
I have two in my lab:
-
One for only AD username and Password
-
Second one for Multi factor; it requires also a random token generator like SecurID RSA or Azure Authenticator. If you want to know how to do this on a NetScaler 11.x or 12.x; go to my next thread about accomplishing this.
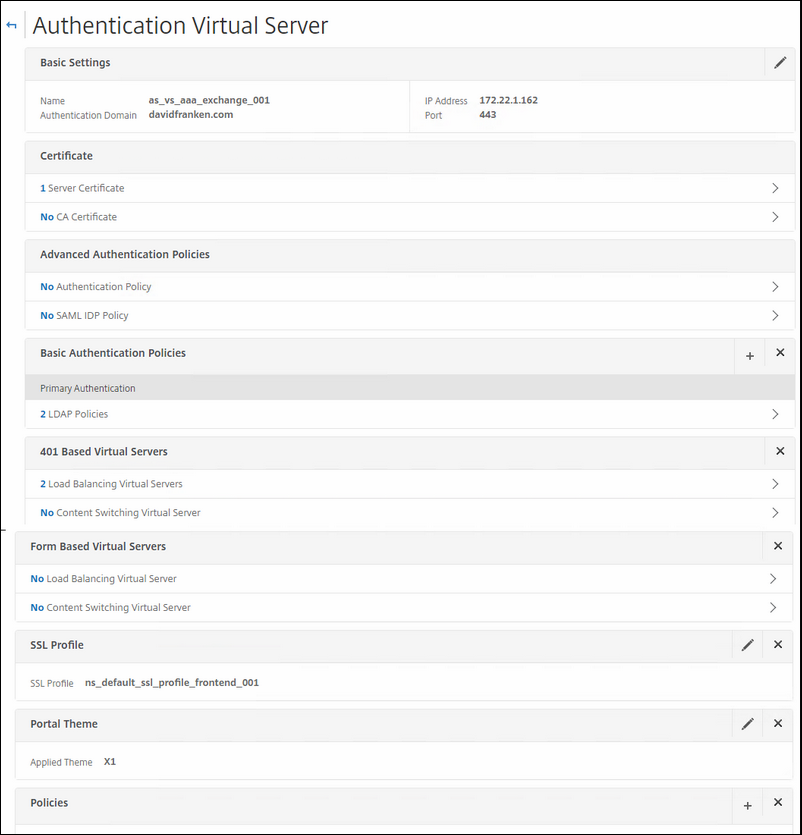
Go to Security / AAA - Application Traffic / Virtual Servers and click add

Here we create the AS virtual server.
Name: choose a name so that you can identify it later
Authentication domain: set the authentication domain to your domain that you use.
IP address and Port: your internal IP that you will connect to and set port to 443.
Certificate: 1 server certificate; the one that you will use when you connect to the AS virtual IP; that can be a internal issue PKI certificate or a public issued one. It should match the FQDN that you will publish your AS virtual IP on.
Basic Authentication: Select here the LDAP or RADIUS policy(s) that you should have created earlier. If not; go to next chapter for this.
401 Based Virtual Servers: This is where you can see where your Authentication Virtual server is configured on. When you create your AS VIP, it will not be connected to a virtual server.
SSL Profile: Select your SSL profile that you hardened with earlier.
Policies: select the exchange OWA SSO Session policy that you created earlier.
This is the Session Policy that you should bind to the AS Virtual VIP.

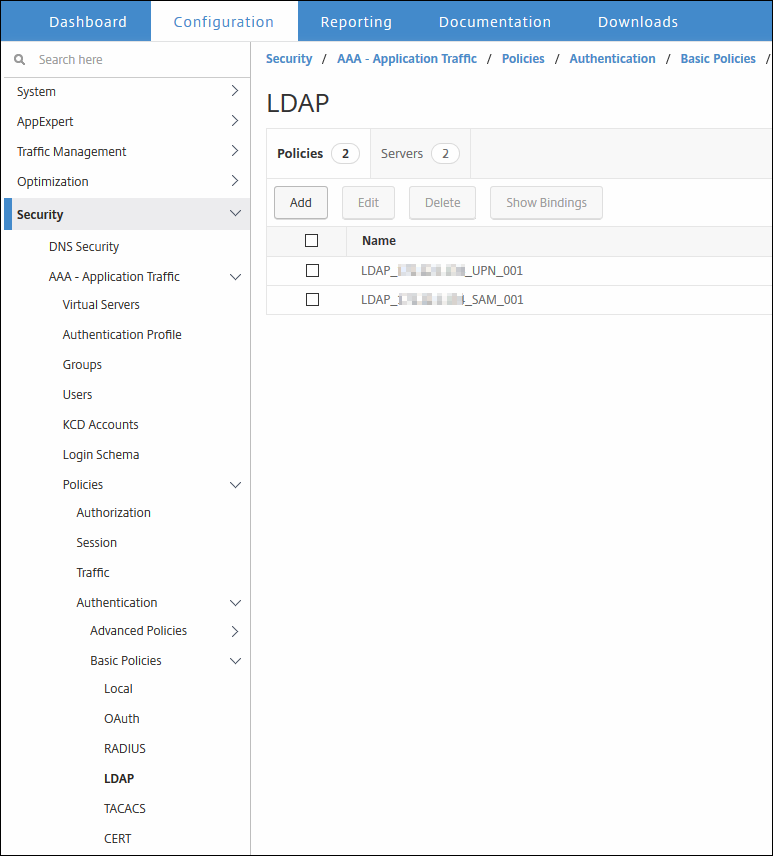
Like I said here above; you should have a correct LDAP policy in place to help your users to authenticate them selves; you can see the figure below how it looks like.
I have created 2 LDAP policies to accommodate this;
-
One is for the Pre-Windows 2000 username (SAMAccountName)
-
Second one is for the UPN username (UserPrincipleName)
Why two LDAP policies?
This is for cascaded login; if the first LDAP policy has failed, it will go to the second etc. This way the user can try his SAMAccountName or his UPN name.

Go to Security / AAA - Application Traffic / Policies / Authentication / Basic Policies / LDAP. Select Servers Tab and click on Add.
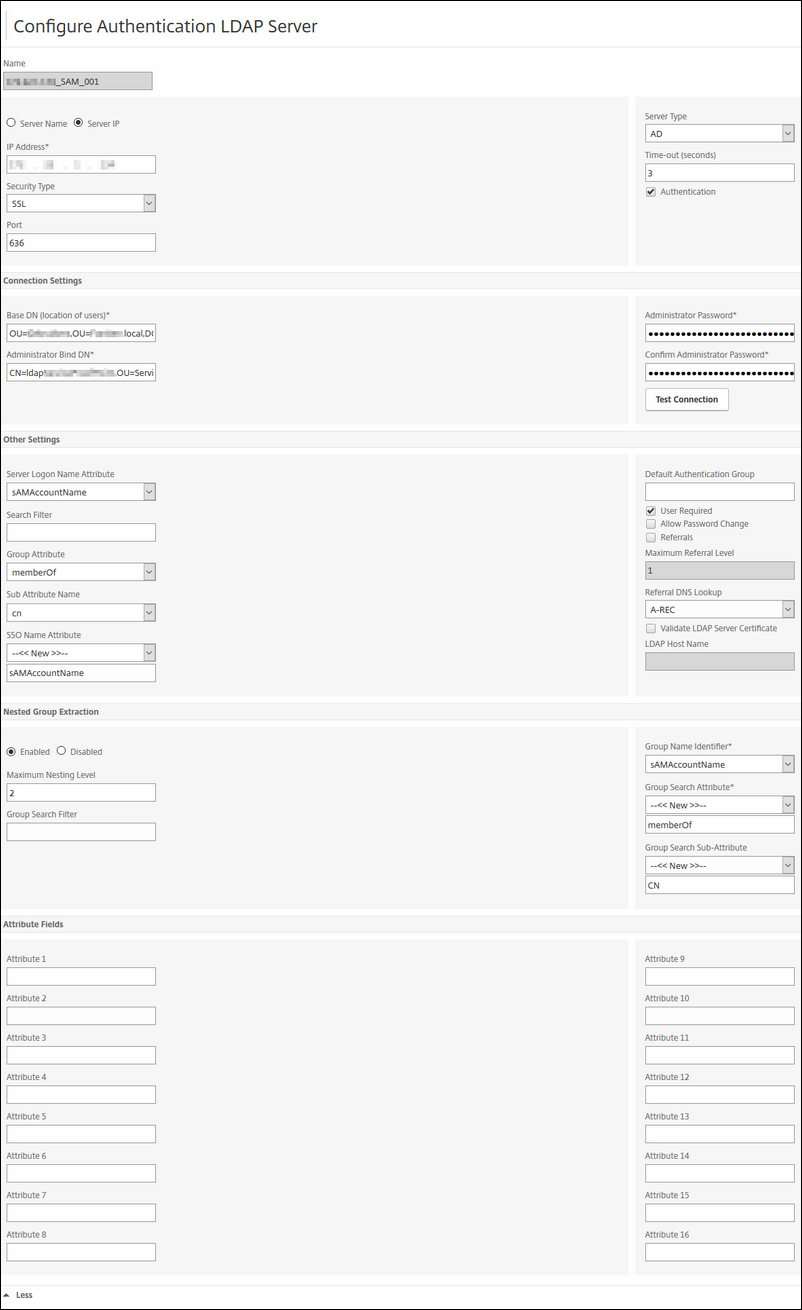
Fill in the following:
Name: LDAP_<IP of Domain Controller>_SAM_001
Server IP: the IP of your LDAP Server, usually a Windows Domain Controller
Security: in my case i have LDAP Secure, so i chose SSL. If you don't have secured your LDAP, choose PLAIN TEXT
Connections Settings:
Base DN: fill in the DN path of your users where the LDAP server should search in
Administrator Bind DN: fill in the full CN of your AD user that the NetScaler will use when crawling your AD via LDAP.
Administrator Password: you know; the AD user your filled in 'Administrator Bind DN'.
After wards you can verify it by clicking on Test Connection; it should look green.
Server Logon Name Attribute: SAMAccountName
Group Attribute: memberOf
Sub Attribute Name: CN
SSO Name Attribute: SAMAccountName (very important here; this will be the username the NetScaler will use then talking to the back-end of your configured VIP.
The rest is default; just compare it and configure it likewise.
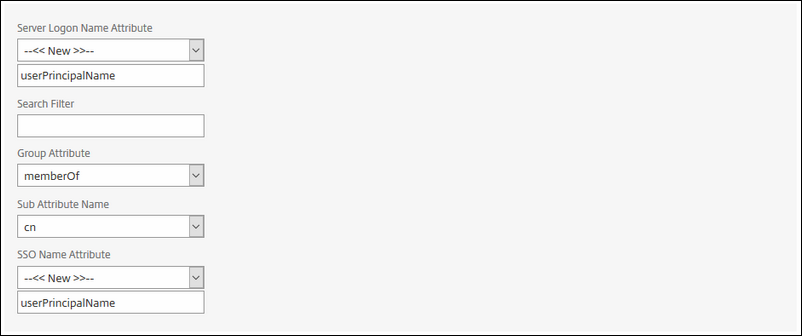
The second LDAP server looks the same as the above LDAP server; only the Server Logon Name- and SSO name Attribute differ.
This one does a LDAP query for the UPN instead.
Now we have created the single factor AS virtual server. I you want to know how to configure dual factor authentication on NetScaler 11.1 or NetScaler 12.0; go to my next thread about how to do this.
Create Virtual Servers
Now we can create the Virtual servers
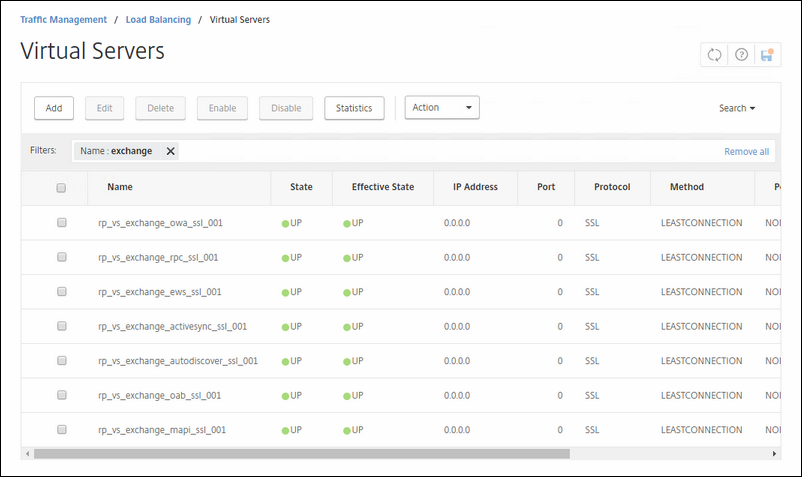
Then we look at the SPECIFIC SETTINGS and/or PERSISTENCY.
|
LB vServer |
Method |
Persistency |
Time-out |
|---|---|---|---|
|
OWA |
LEAST CONNECTION |
NONE |
DEFAULT |
|
EWS |
LEAST CONNECTION |
NONE |
DEFAULT |
|
ActiveSync |
LEAST CONNECTION |
SRCIPDESTIP |
30 min |
|
Autodiscover |
LEAST CONNECTION |
SOURCEIP |
30 min |
|
OAB |
LEAST CONNECTION |
NONE |
DEFAULT |
|
MAPI |
LEAST CONNECTION |
RULE |
240 min |
The first vServer will be for Outlook Web Access.
Do the following:
Name: rp_vs_exchange_owa_ssl_001
Services: the service group you created earlier for OWA.
Certificate: choose the certificate you will use for OWA.
SSL Profile: choose the correct SSL profile we created earlier.
Authentication: in my setup i choose the dual factor setup, but you can choose the single factor AS server i used in this blog post. If you want to use the Dual Factor method, check my other blog post how to this. Until then, stick to the single factor AS server. :)
Polices: we have 3 policies in total; 2 for traffic and 1 for enabling HSTS.
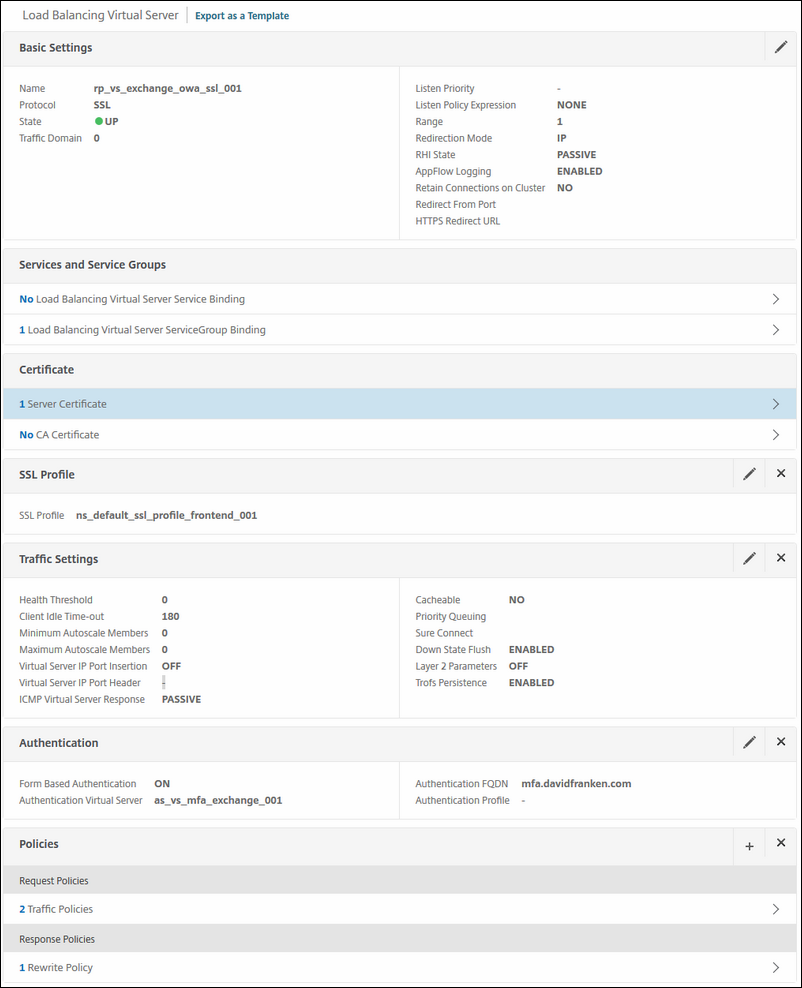
Here are both traffic policies for Logging in and logging out of OWA

And the rewrite policy for inserting HSTS in the header.

This next vServer is for RPC calls from the Outlook Client. You will notice this one is very simple put together compared to the one used for OWA.
RPC communication is important for Exchange version prior Exchange 2013. From Exchange 2013 and forward, Microsoft will gradually say goodbye to RPC over HTTP and hello to MAPI over HTTP communication. When using Exchange 2013 or higher, the NetScaler VIP for the RPC traffic will not have any hit registered. But for allowing Outlook Clients that don't have MAPI compatibility, the RPC vServer can come in handy.
So let's get going on the configuration:
Name: rp_vs_exchange_rpc_ssl_001
Service Group: the service group you specially made for this exchange service.
Certificate: choose the correct certificate for this.
Policy: choose the rewrite policy for HSTS.

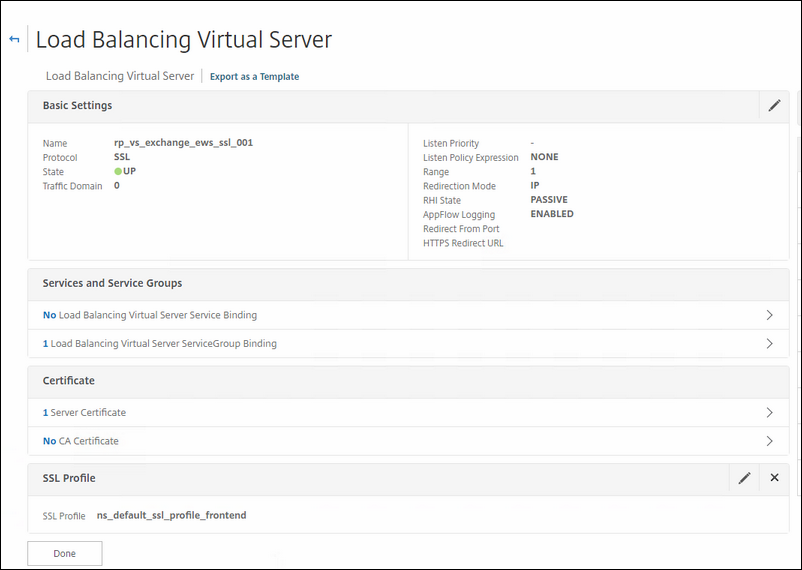
This vServer is for Exchange Web Access.
Name: rp_vs_exchange_ews_ssl_001
Service Group: the service group you specially made for this exchange service.
Certificate: choose the correct certificate for this.
Policy: choose the rewrite policy for HSTS.
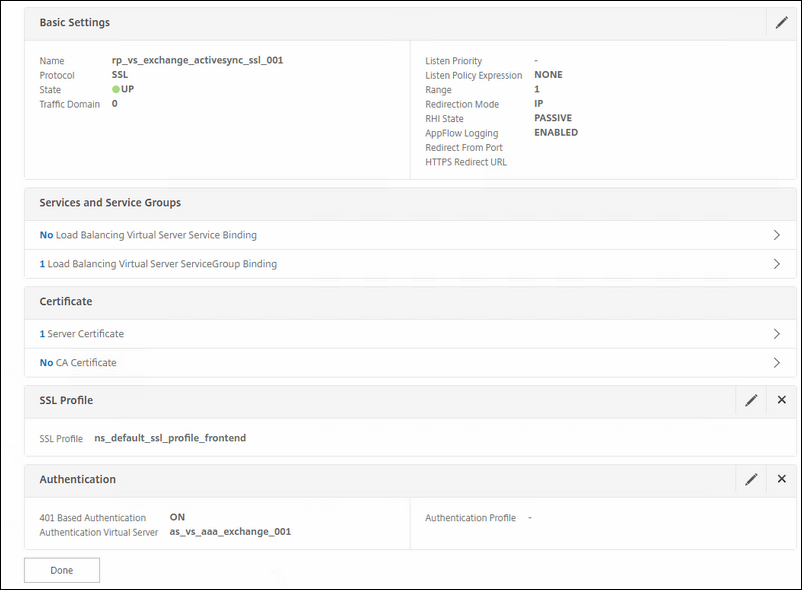
This vServer is for ActiveSync. This one has also 401-based authentication enabled on it.
Name: rp_vs_exchange_activesync_ssl_001
Service Group: the service group you specially made for this exchange service.
Certificate: choose the correct certificate for this.
Authentication: choose the AS server you created for this that uses the single factor.
Policy: choose the rewrite policy for HSTS.
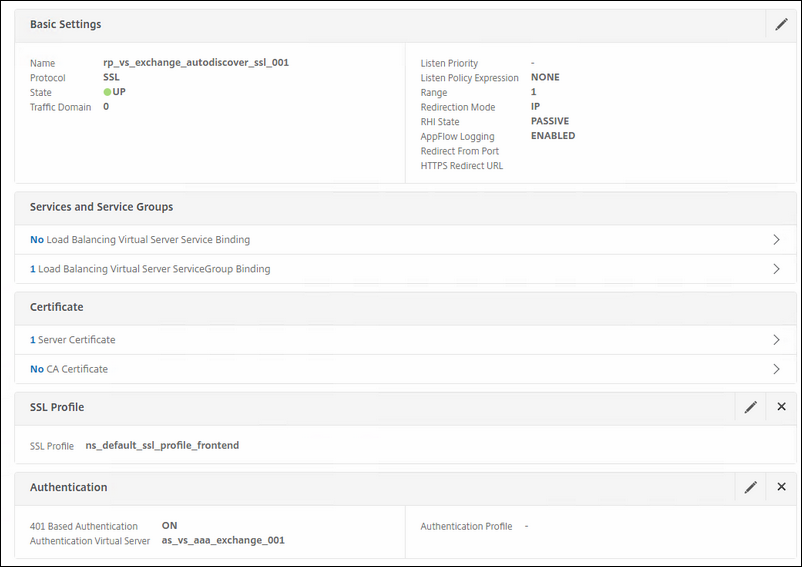
UPDATE 04-SEPT-2017: I discovered that by protecting Autodiscover with a 401-authentication; the Skype for Business client is not capable to utilizing this, resulting in not discovering EWS settings. Lack of EWS result in; no calendar information, no free/busy information etc. So my advice is not to protect Autodiscover with a 401-authentication if you are using Skype for Business. If not; leave it on; your Outlook Client can handle this.
This vServer is for Autodiscover. This one has also 401-based authentication enabled on it.
Name: rp_vs_exchange_autodiscover_ssl_001
Service Group: the service group you specially made for this exchange service.
Certificate: choose the correct certificate for this.
Authentication: choose the AS server you created for this that uses the single factor.
Policy: choose the rewrite policy for HSTS.
For the Outlook AddressBook.
Name: rp_vs_exchange_oab_ssl_001
Service Group: the service group you specially made for this exchange service.
Certificate: choose the correct certificate for this.
Policy: choose the rewrite policy for HSTS.
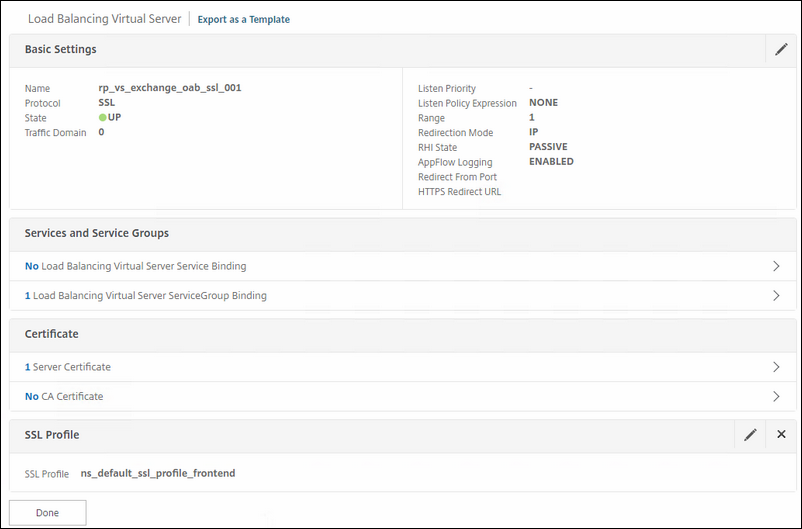
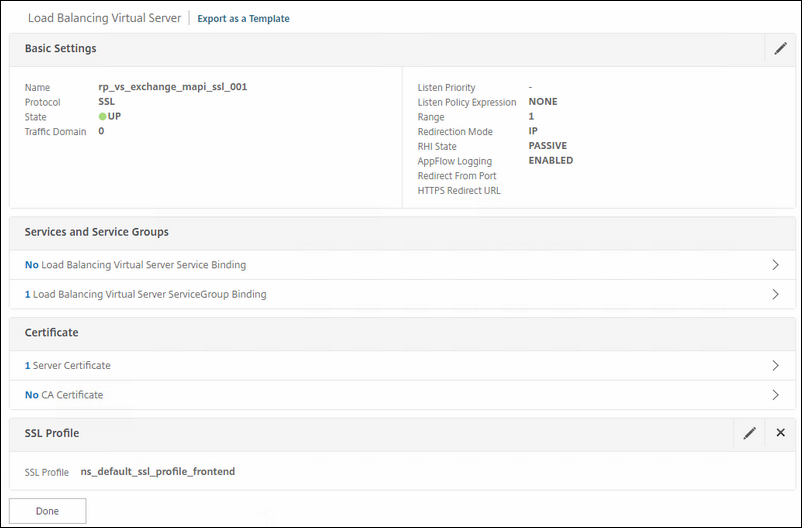
For MAPI over HTTPS connections
Name: rp_vs_exchange_mapi_ssl_001
Service Group: the service group you specially made for this exchange service.
Certificate: choose the correct certificate for this.
Authentication: none; the real server will handle this. As of time of this writing, NetScaler doesn't support the authentication between MAPI client and Exchange 2016.
Policy: choose the rewrite policy for HSTS.
Create content vSwitch
No we have all the vServers in place, lets try hem all together in one content vSwitch.
Go to Traffic Management / Content Switching / Virtual Servers and click add.
Here we must pay close attention:
Name: cs_vs_www_ssl_001
Content switching Policy Binding: select all content switching policies in the correct order.
Certificate: choose the correct certificate for this, you must enable SNI on both the SSL profile as on binding the certificate if you choose to use more than 1 FQDN on the content vSwitch. This is the case once you use Exchange 2013 and higher, Office Online Server can also be used by this content vSwitch :).
Authentication: none; this will be handled by the individual vServer.
Policy: choose the rewrite policy for HSTS.

This is the response policy for the content vSwitch.

Here we have all the bindings that bind all of your vServers to the content vSwitch
You can see that instead of the using the Expression mentioned in the Citrix guide; i used a different one. One that ignores CASES. Quite handy don't you think :)
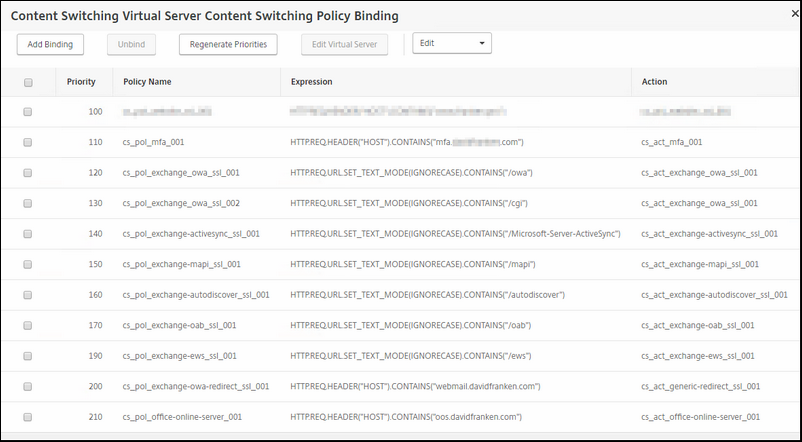
First you must create each content switch action.
Each action must target is own virtual server.
Go to Traffic Management / Content Switching / Actions
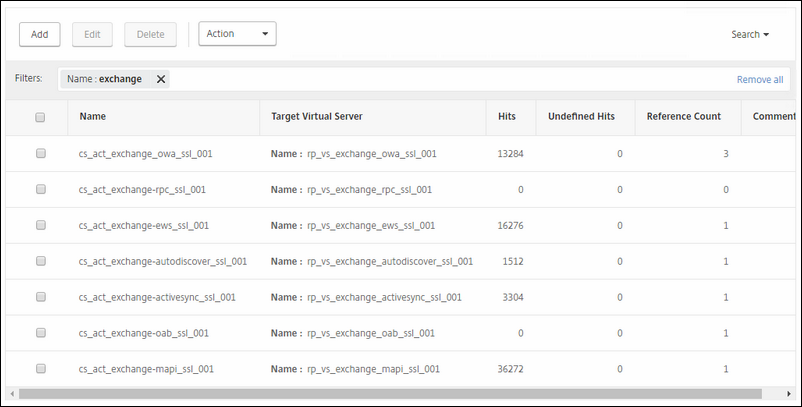
After creating the action; it is now time for the Policies.
Go to Traffic Management / Content Switching / Policies
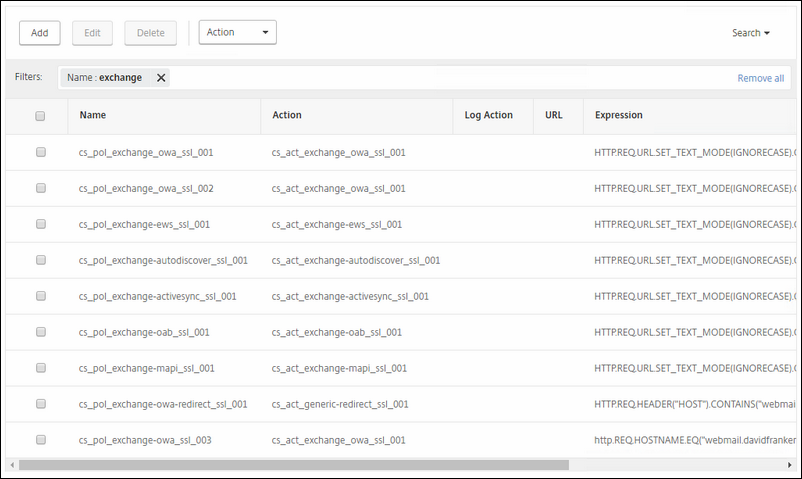
Here are all the expressions I choose and put in specific order to use after reading the Recommended configuration example for Netscaler load balancing of Microsoft Exchange on Citrix.
Funny thing these steps are not mentioned in the Citrix Exchange Guide, they should if you ask me.
HTTP.REQ.URL.SET_TEXT_MODE(IGNORECASE).CONTAINS("/mapi")
HTTP.REQ.URL.SET_TEXT_MODE(IGNORECASE).CONTAINS("/owa")
HTTP.REQ.URL.SET_TEXT_MODE(IGNORECASE).CONTAINS("/cgi")
HTTP.REQ.URL.SET_TEXT_MODE(IGNORECASE).CONTAINS("/ews")
HTTP.REQ.URL.SET_TEXT_MODE(IGNORECASE).CONTAINS("/autodiscover")
HTTP.REQ.URL.SET_TEXT_MODE(IGNORECASE).CONTAINS("/Microsoft-Server-ActiveSync")
HTTP.REQ.URL.SET_TEXT_MODE(IGNORECASE).CONTAINS("/oab")
HTTP.REQ.URL.SET_TEXT_MODE(IGNORECASE).CONTAINS("/ecp")
|
|
Now we are almost done here. You must make sure that your Exchange servers that will face your users, have the correct authentication setting for OWA and ECP.
This must be set to Form based and UPN; otherwise SSO for OWA will not work.
Go to your Exchange Admin center (https://FQDN/ecp) / servers / virtual directories / owa
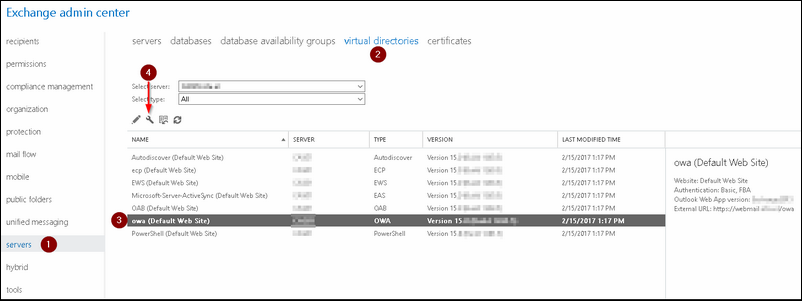
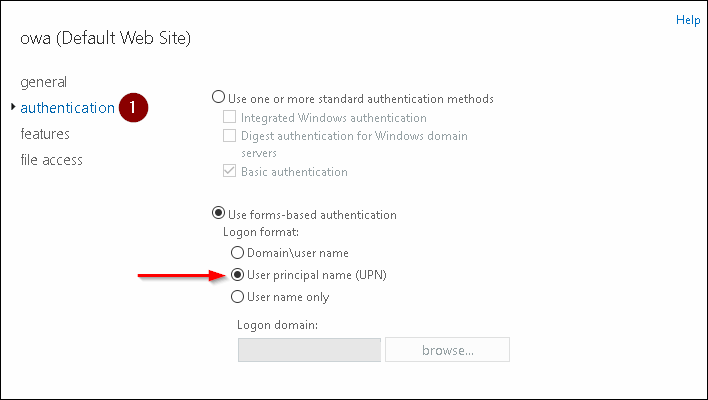
You can choose for the basic Authentication way or choose for the FBA (Form Based Authentication) ; the latter I would prefer and I will tell you why.
Before Exchange 2016 CU4, you could enable the Legacy Logoff string by editing the exchange config file, so that when you are using a 401 basic authentication when reverse proxying it; the load balancer would recognize the logoff button when pressed and thus properly closing the connection to the client; the user is now logged off. I wrote a blog post about how to do this on a KEMP load balancer.
Well after the release of Exchange 2016 CU4, Microsoft Exchange Team decided to roll back this feature. Thus breaking the logoff recognition when using 401 basic authentication.
I also checked at the Exchange team blog for an answer; the Exchange team confirmed that the logoff.owa is the new (or old way, its how you look at it) for logging off.
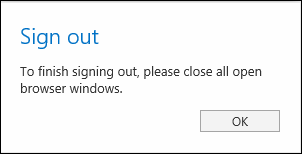
I broke my head about this because at first I thought something was wrong with my reverse proxy setup; every time I pressed the Log Off button only a popup would appear (like the one below). Even when I tried directly logging on the webmail without using the reverse proxy had the same result. So by testing directly I ruled out this was a reverse proxy issue; it is apparently by design.
So how to overcome this; ?
You can go for the FBA, but some load balancers cannot handle FBA properly with a nice AAA proxy page, like KEMP load balancer (as of time this writing of course). But the NetScaler can do a nice FBA login for you and use the authentication proxy at the same time! So NetScaler is in in de advantage here.
Done!
That's it! Thank you for reading.
